A couple of months ago I made the relatively hard decision to migrate from Gitea to Forgejo. Why? Well, I think that is a complex topic - a lot of my reasons are the same reasons outlined in the Open Letter to Gitea that resulted in Forgejo being established and eventually hard-forked from Gitea. Ultimately, I feel a lot better about running Forgejo in the long term. So I decided to "pack up my bags" in Gitea so to speak, and make the move to Forgejo.
Here's the bad news, there isn't a straight-forward way of migrating to Forgejo from Gitea anymore. You can read more about why here in a blog post from Forgejo from the end of last year. Having chosen to migrate after this hard cut-off, I felt like a bit of a fool for not doing it earlier. Thankfully migrating most of your data from Gitea is still possible, which I will go over in a later section, but you will be starting fresh in some regards.
Because of that, this guide isn't strictly about migrating from Gitea to Forgejo, but about deploying and configuring a fresh instance of Forgejo and taking advantage of it's best features.
This guide is also meant to serve as an update/compliment to my previous guide on combining Gitea, Renovate, and Komodo for automated Docker updates. The main inspiration for writing this guide is that the approach for deploying Forgejo Actions is quite a bit different compared to Gitea Actions.
Overview🔗
As mentioned, this guide will cover a variety of topics that extend beyond the basic/default Forgejo Deployment - here's a summary of what to expect:
- Deploying and configuring Forgejo with some of my personally recommended defaults.
- Deploying a Forgejo Actions Runner, and configuring it within Forgejo for CI/CD capabilities.
- Configuring Forgejo to use external OAuth2 authentication (via Pocket ID) in place of it's own built-in authentication.
- Migrating existing repos from Gitea to Forgejo.
- Setting up GPG commit signing & verification for both yourself and Forgejo.
The sections in this article are ordered from most to least important/recommended. While everything beyond the initial Forgejo setup is technically optional, at a bare minimum I would recommend setting up Forgejo Actions (and migrating your repos if you are coming from Gitea). Essentially, if you think you wouldn't benefit from a section in this guide, feel free to give it a skip!
Prerequisites🔗
- A host machine with Docker & Docker Compose installed and running. I will be using my custom built NAS running Unraid.
- A reverse proxy that allows you to access your services securely via subdomains (like
forgejo.yourdomain.com) over https. I'll hopefully have a guide for setting up Traefik out soon (no promises, but I'll link it here once it exists). - An email provider that supports SMTP (for sending notifications via Forgejo)
Setting up Forgejo🔗
Setting up Forgejo is pretty straight forward, and the official process for deploying via Docker is documented here.
Database Decisions🔗
The first big decision to make is which database to use. Forgejo's database is a critical component to the application - nearly everything outside of the raw Git repositories and the application configuration relies on the database in some way (user info, issues, pull requests, activity history, etc). On top of that, often times Git providers like Forgejo are critical component to your greater home lab (it definitely is in mine). Because of this, having the backbone of your Forgejo instance be rock solid is very important.
There are three to choose from SQLite (internal), MySQL (external), and PostgreSQL (external). While any one of these will probably be fine for home use, I will be recommending using PostgreSQL in this guide. In my 5+ of years of self-hosting, it's the one database that has never let me down (yet...) and in my experience is the champion of performance and reliability in this kind of application when compared to MySQL, and even more so compared to SQLite.
Deploying Forgejo🔗
Here is my Docker Compose configuration at the time of writing (the version tags may be out of date depending on when you are reading this):
# docker-compose.yaml

services:
  server:
    image: codeberg.org/forgejo/forgejo:12.0.1@sha256:f5ee3fc67479c4015002b6b756ad7980cd8642f45376fc9cd073969c3292530b
    container_name: forgejo-server
    restart: always
    environment:
      - TZ=America/Los_Angeles
      - FORGEJO__database__DB_TYPE=postgres
      - FORGEJO__database__HOST=database:5432
      - FORGEJO__database__NAME=forgejo
      - FORGEJO__database__USER=forgejo
      - FORGEJO__database__PASSWD=${FORGEJO_DATABASE_PASSWORD}
    volumes:
      # replace the left-hand side from the ':' with your own path
      - /mnt/user/appdata/forgejo/data:/data
    ports:
      - 3205:3000
    depends_on:
      - database

  database:
    image: postgres:17.5@sha256:864831322bf2520e7d03d899b01b542de6de9ece6fe29c89f19dc5e1d5568ccf
    container_name: forgejo-database
    restart: always
    environment:
      - POSTGRES_DB=forgejo
      - POSTGRES_USER=forgejo
      - POSTGRES_PASSWORD=${FORGEJO_DATABASE_PASSWORD}
    volumes:
      # replace the left-hand side from the ':' with your own path
      - /mnt/user/appdata/forgejo/database:/var/lib/postgresql/data
# .env
FORGEJO_DATABASE_PASSWORD="your own database password"From here, run docker compose up from inside the folder your files are in, and you should be off to the races.
Initial Configuration🔗
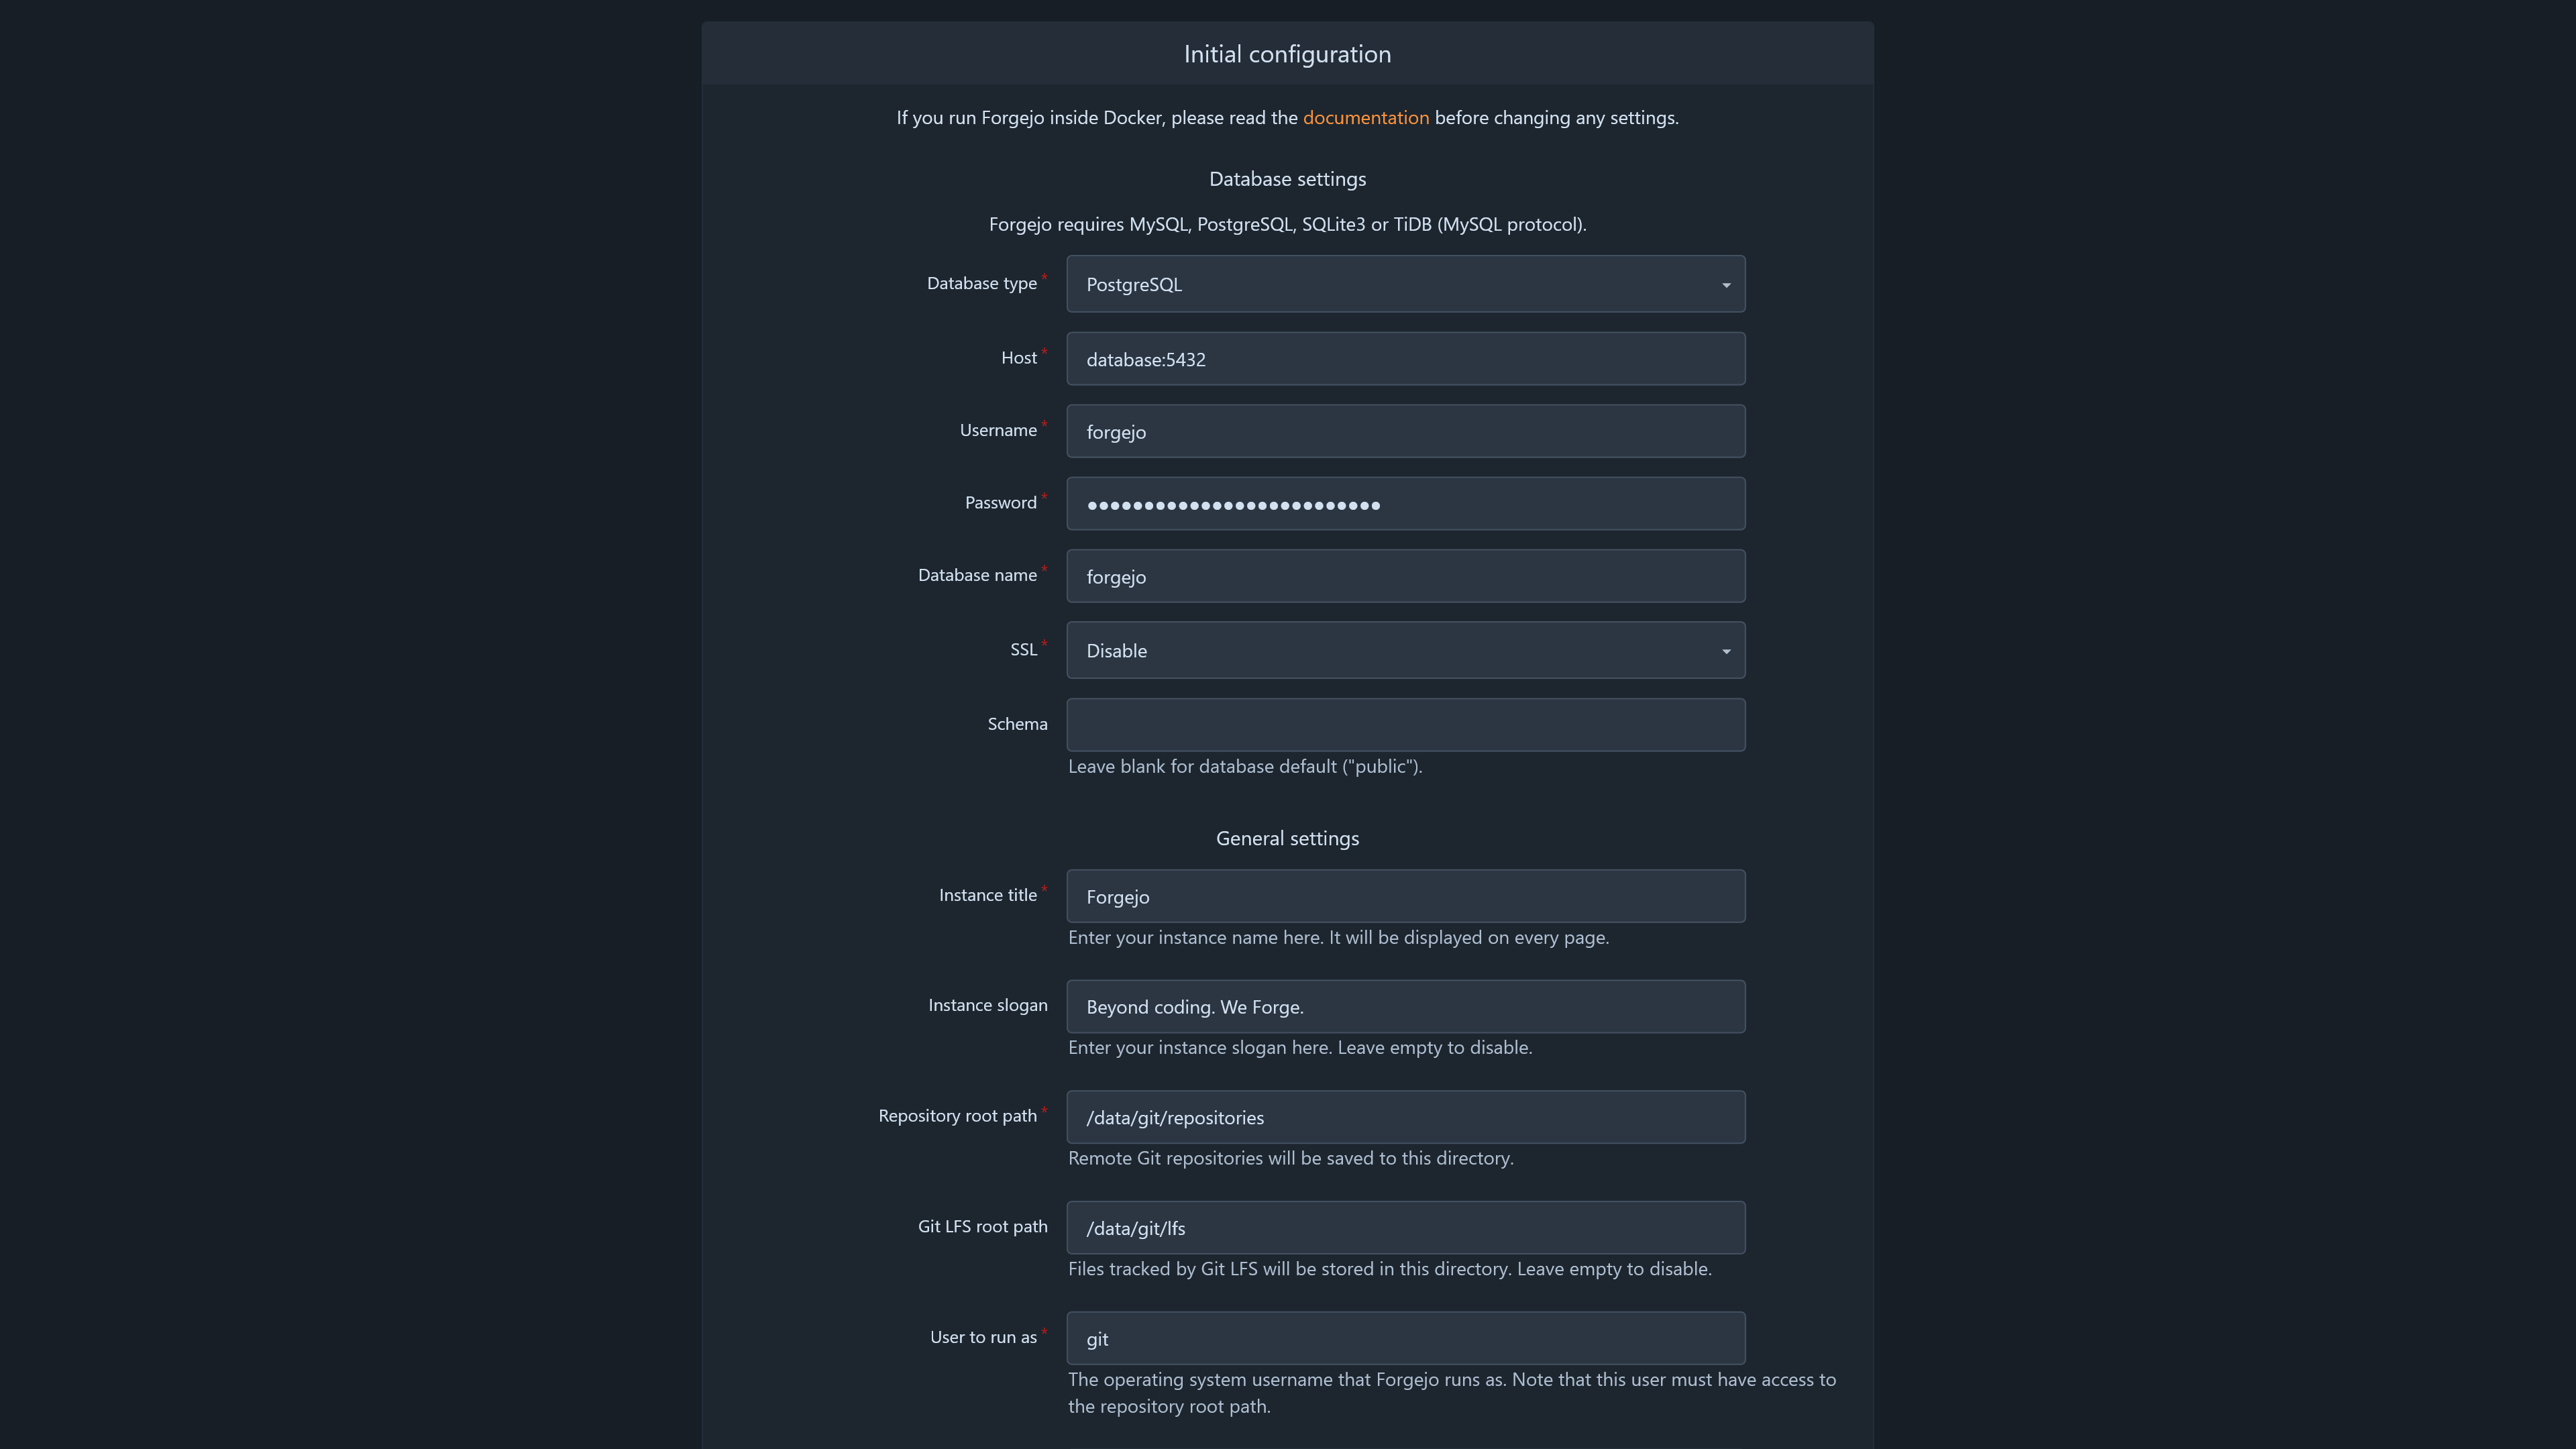
At this point, I would recommend making sure you have a reverse proxy like Traefik, Caddy, or NPM Plus setup with a domain and configured to serve your Forgejo instance at a subdomain like forgejo.yourdomain.com. You can access Forgejo's configuration wizard at your domain (like https://forgejo.yourdomain.com) or at the IP of your server with the exposed port (like http://192.168.1.2:3105). Everything in this setup wizard can be changed later if needed, so don't fret too much about the various options that are up to your discretion.
Database Settings🔗
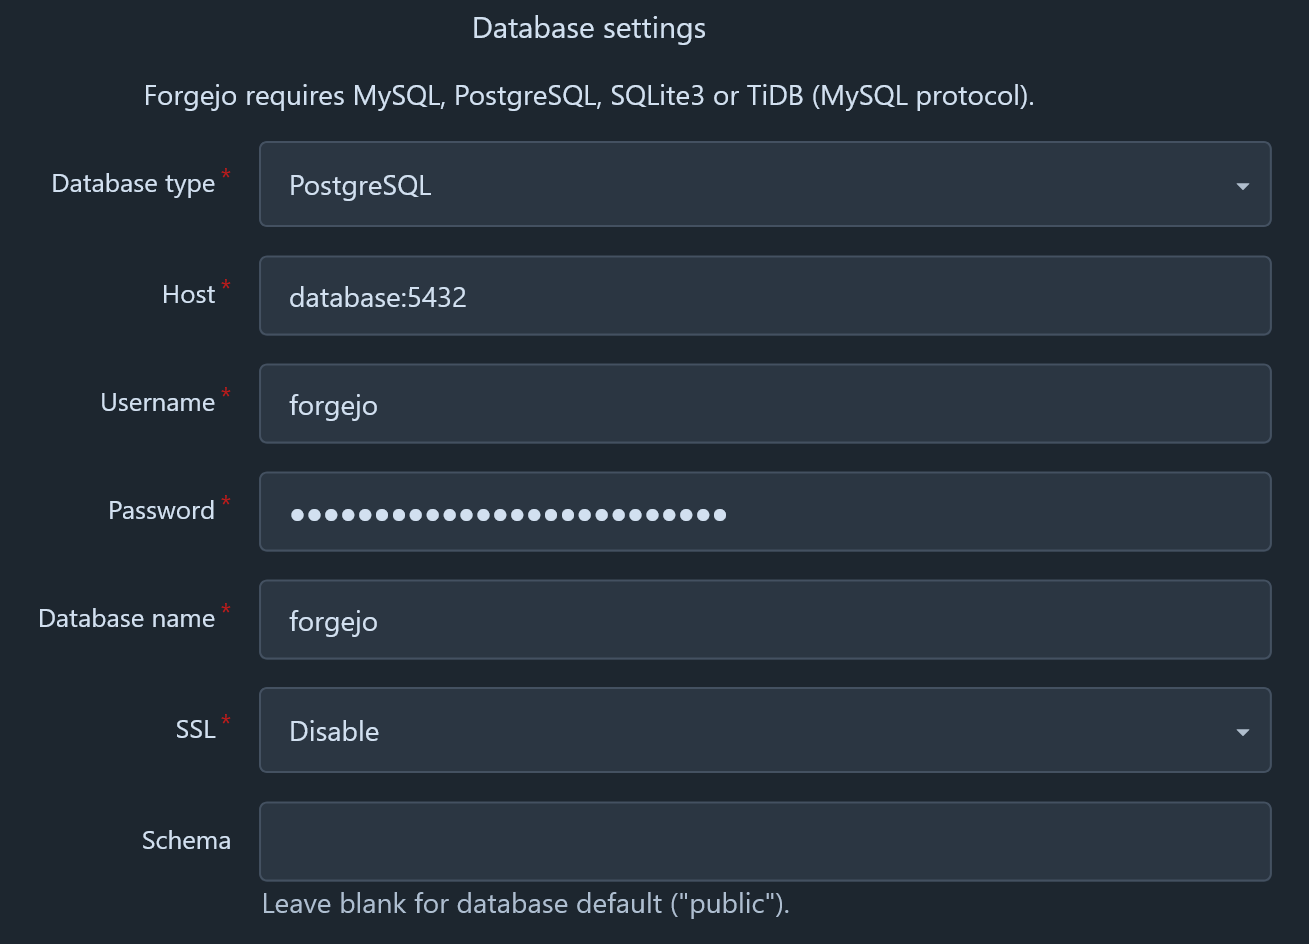
If you correctly configured your environment variables in your docker-compose.yaml file, all the values for this section should be pre-populated and ready to go!
General Settings🔗
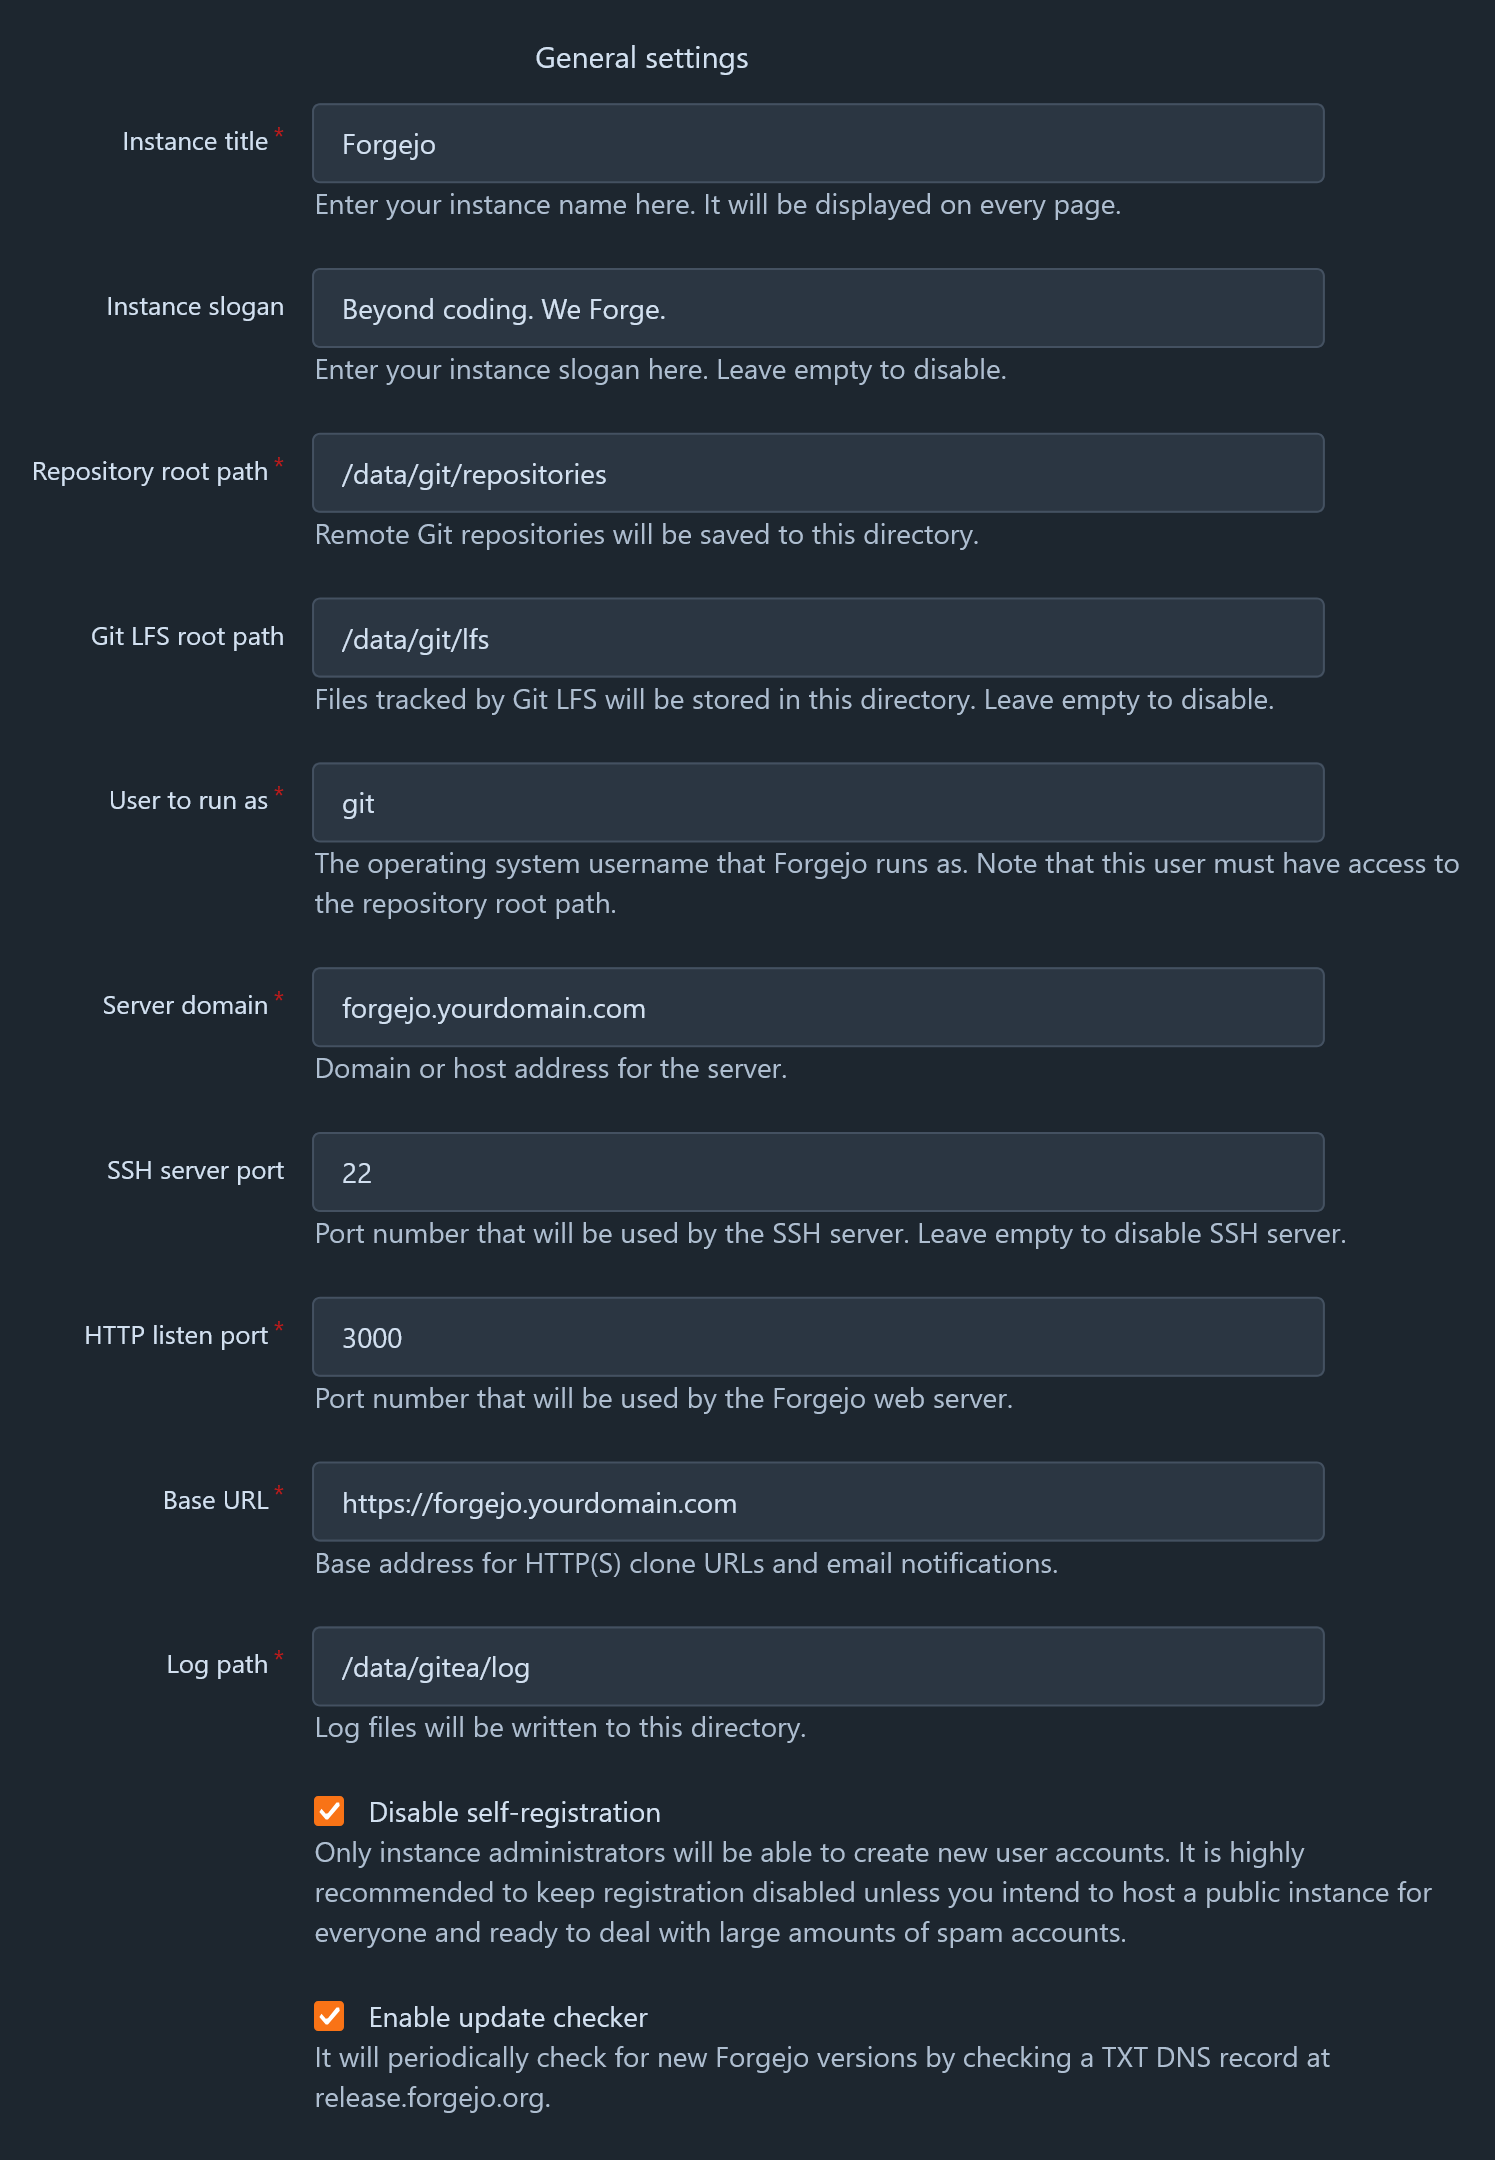
This section has some things you shouldn't change, some you can change if you like, and some that you will need to change//verify are correct:
- Instance title: Customize as desired
- Instance slogan: Customize as desired
- Repository root path: Leave as-is
- Git LFS root path: Leave as-is
- User to run as: Leave as-is
- Server domain: Set to your custom subdomain like
forgejo.yourdomain.com - SSH server port: Leave as-is
- HTTP listen port: Leave as-is
- Base URL: Set to your custom subdomain (with http/https) like
https://forgejo.yourdomain.com - Disable self-registration: Recommended to leave as-is (
true) - Enable update checker: Customized as desired
Email settings (Under Optional settings)🔗
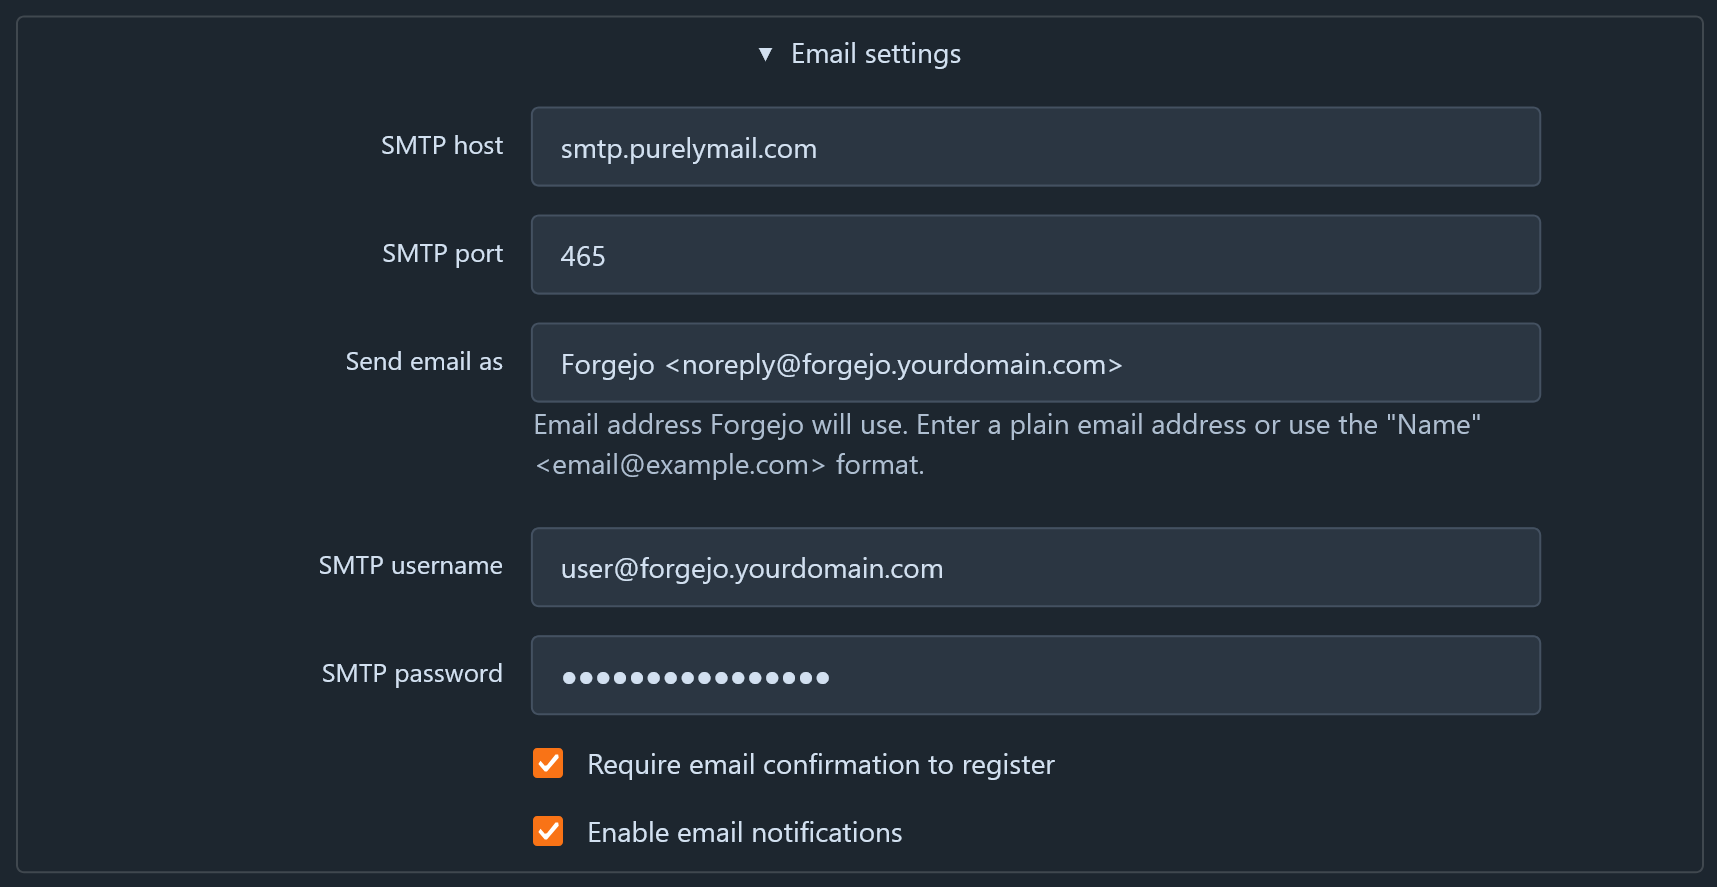
Getting email notifications from Forgejo is (imo) an essential feature of the application, especially so if other people besides yourself will be using it. Gitea uses SMTP for sending mail, which means you can configure most popular email services to work with the application.
If you have your own domain and are interested in sending email from that domain, I believe Twilo SendGrid has a somewhat generous free tier that will likely work for many. In my case, I wanted to be able to send and recieve email from my custom domain. If you are like me, I can recommend PurelyMail (not sponsored or anything, I just like the service), which costs me ~$0.33 - $0.35/month for my usage. Alternatively, if you happen to pay for an iCloud subscription, you likely can use that for sending email from your custom domain. If you go the custom domain route, I recommend configuring it to send mail from an address like noreply@forgejo.yourdomain.com.
Regardless of what you choose, I recommend ensuring your account has 2FA enabled, and using an "App Password" or similarly named for your login credentials. Here's what I put in the section below using PurelyMail as my provider:
- SMTP host:
smtp.purelymail.com - SMTP port:
465 - Send email as:
Forgejo <noreply@forgejo.yourdomain.com> - SMTP username:
user@forgejo.yourdomain.com - SMTP password:
yourpasswordhere - Require email confirmation to register:
True(recommended) - Enable email notifications:
True
Server and third party service settings (Under Optional settings)🔗
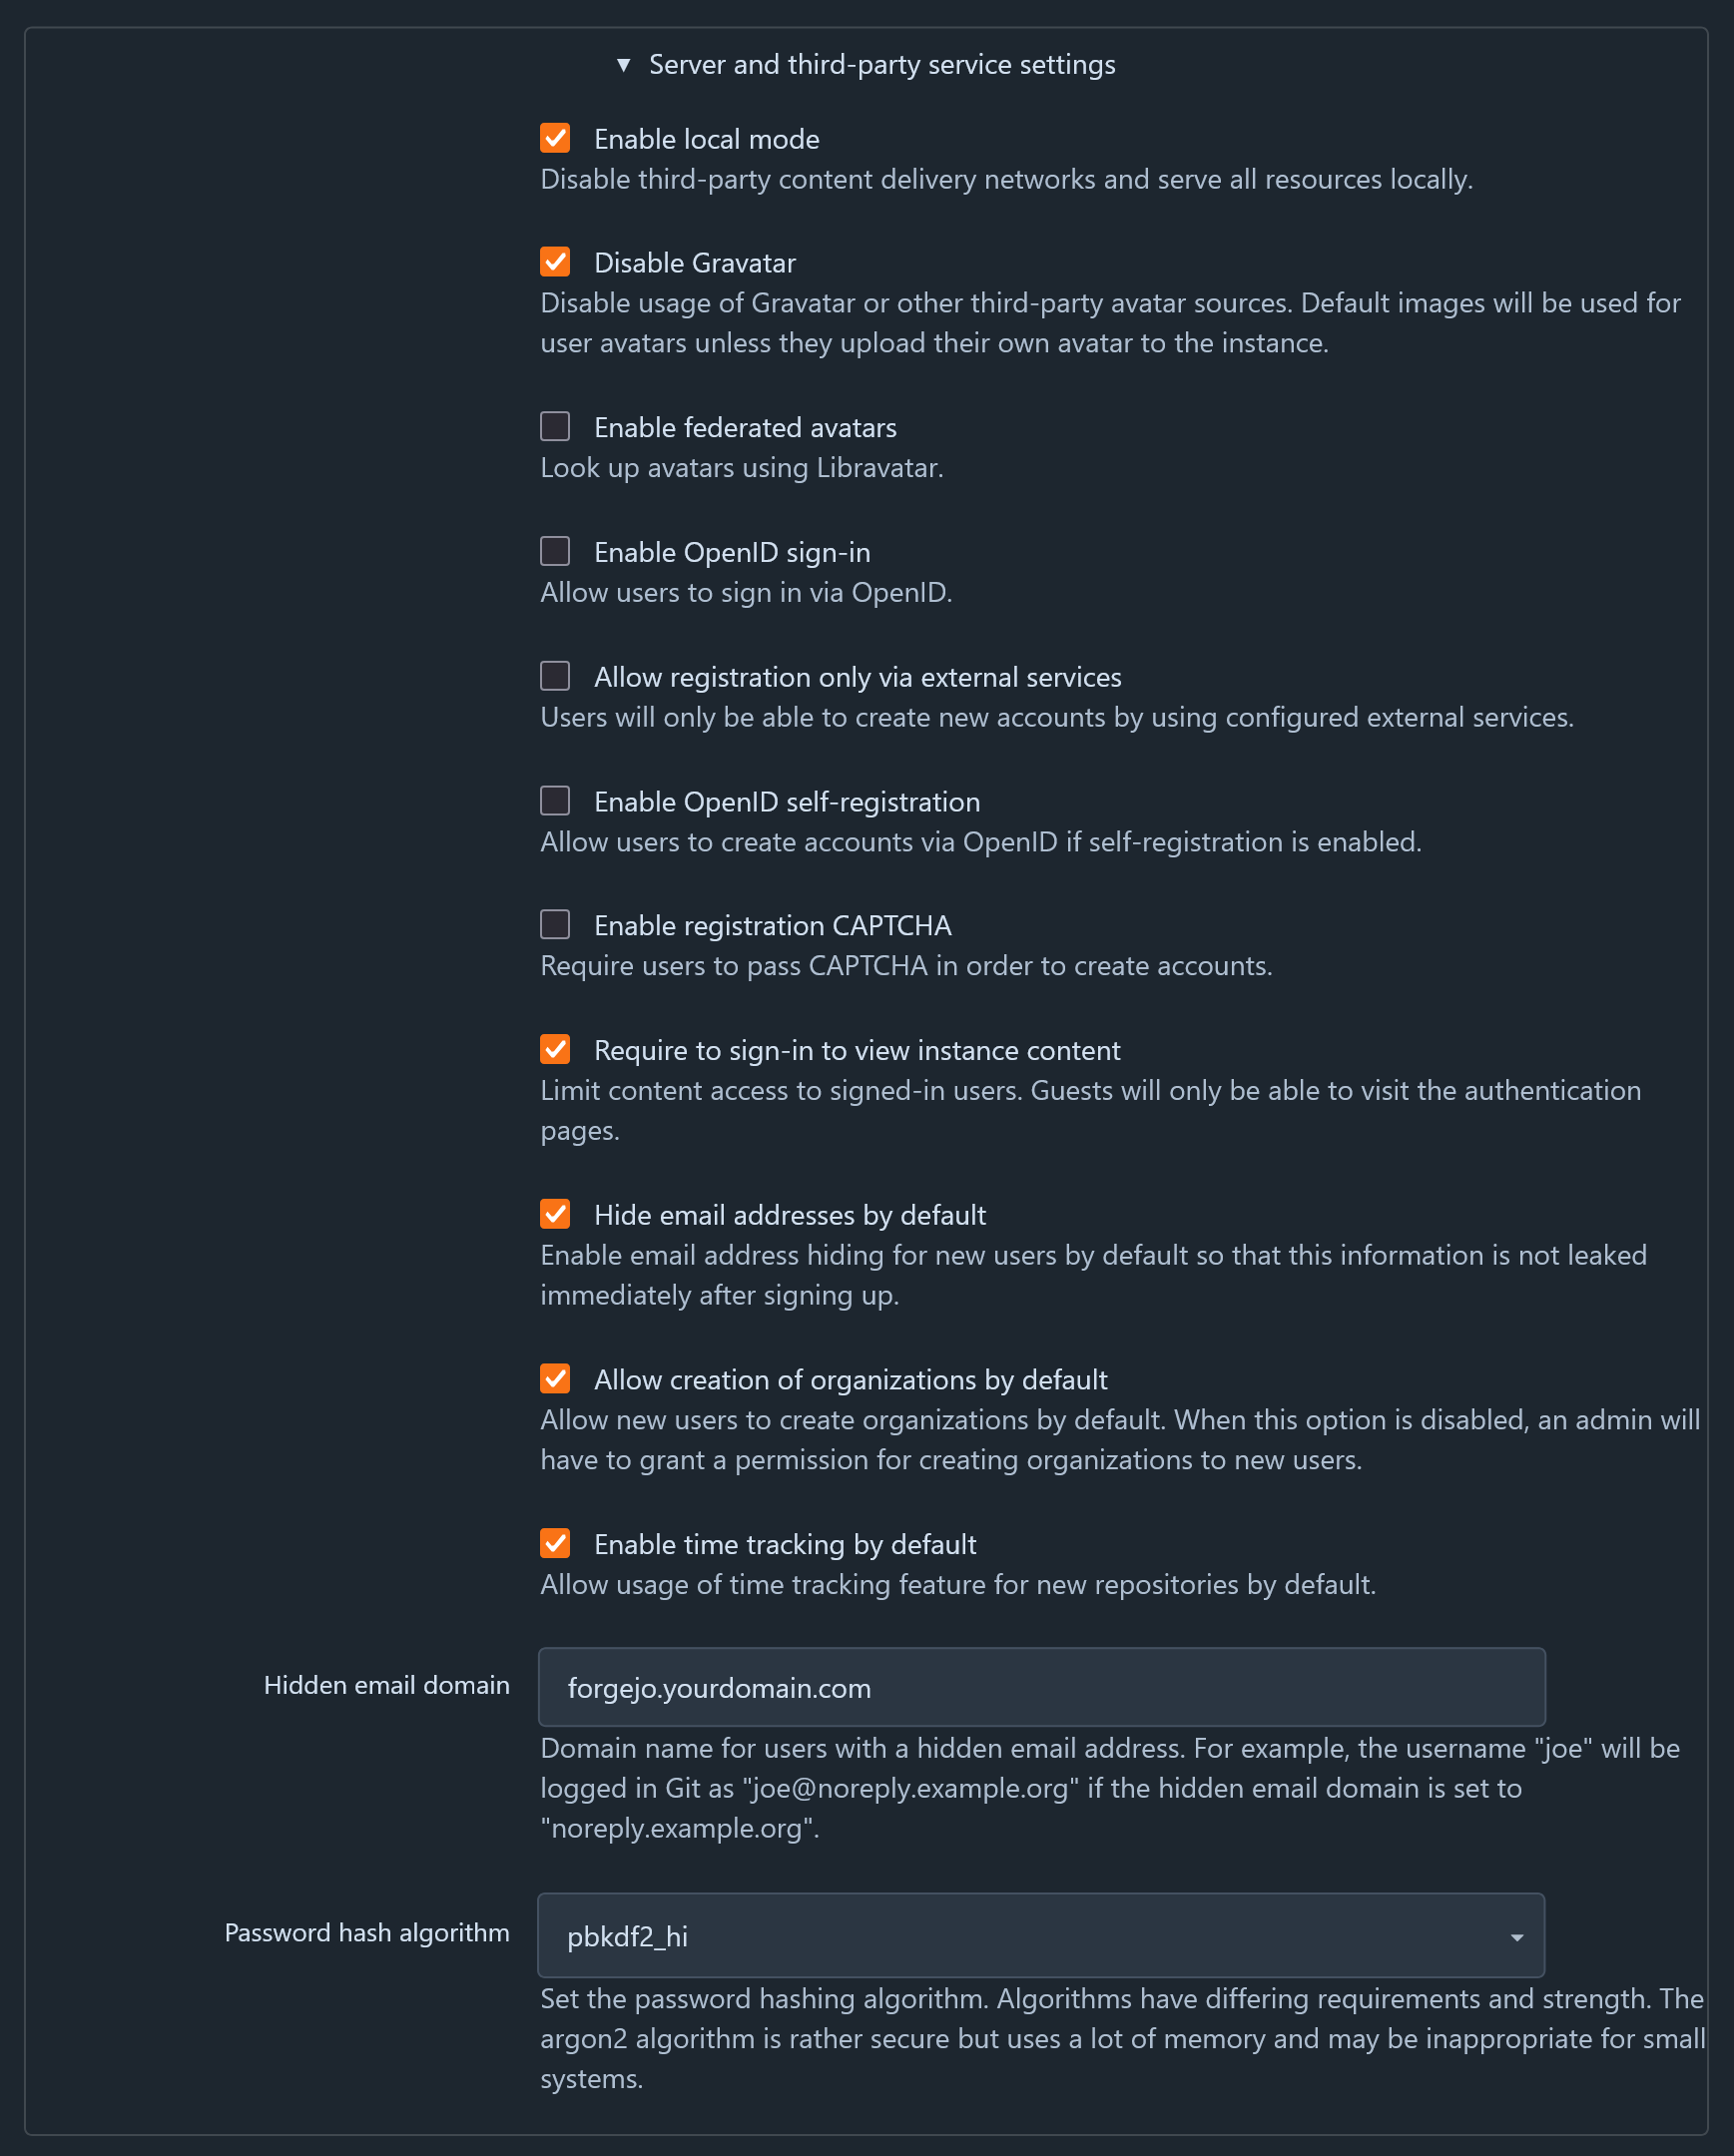
This next section is mostly up to you depending on how open/closed you want your Forgejo instance to be.
- Enable local mode: Leave as is
- Disable Gravatar: Leave as is, or configure as desired (influences automatically fetching avatar images from a third party)
- Enable federated avatars: Leave as is, or configure as desired (influences automatically fetching avatar images from a third party)
- Enable OpenID sign-in: Set to
false - Allow registration only via external services: Leave as is (for now)
- Enable OpenID self-registration: Set to
false - Enable registration CAPTCHA: Leave as is
- Require to sign-in to view instance content: Set to
true(recommended) - Hide email addresses by default: Leave as is, or configure as desired
- Allow creation of organizations by default: Set to
false(recommended) - Enable time tracking by default: Leave as is, or configure as desired
- Hidden email domain: Set to your custom domain, like
forgejo.yourdomain.com, or leave as-is - Password hash algorithm: Leave as-is
Administrator account settings (Under Optional settings)🔗
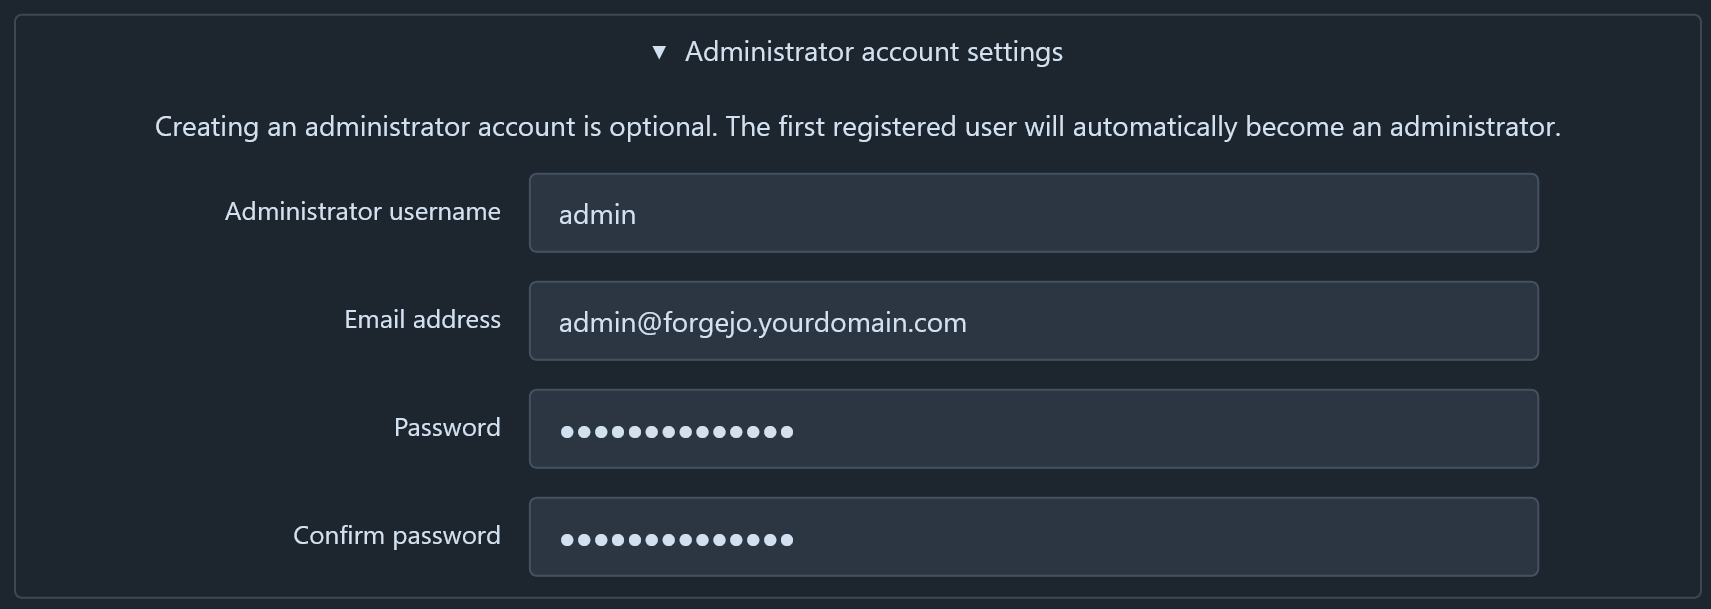
Here you can setup your first user (who will become the instance's administrator), which I recommend. That said, I think there are two approaches for administration you can go for here:
-
Separate admin and personal accounts (recommended): You will create a user named
forgejofor your first user, and only handle administration of the instance through this account. You will then create a second user with more limited permissions to serve as your personal account where you do your non-administrative activities in Forgejo.- Pros: Possibly better for security, your dashboard won't be cluttered by all activity from the server.
- Cons: You'll have to log out and switch accounts to handle administrative tasks.
-
One account to rule them all: You will have one user that will serve as your primary/regular Forgejo user and handle all administration through as well.
- Pros: Everything is in one place, no account switching to handle admin tasks - convenient.
- Cons: Very busy dashboard (by default) if your instance has other users. Potential to make mistakes due to unchecked permissions.
I recommend the two account approach. For me, it means I can focus solely on my projects when I want to, and then switch to the admin account to deal with Forgejo. If you choose the two account approach, don't worry about the second user for now, we will deal with that later.
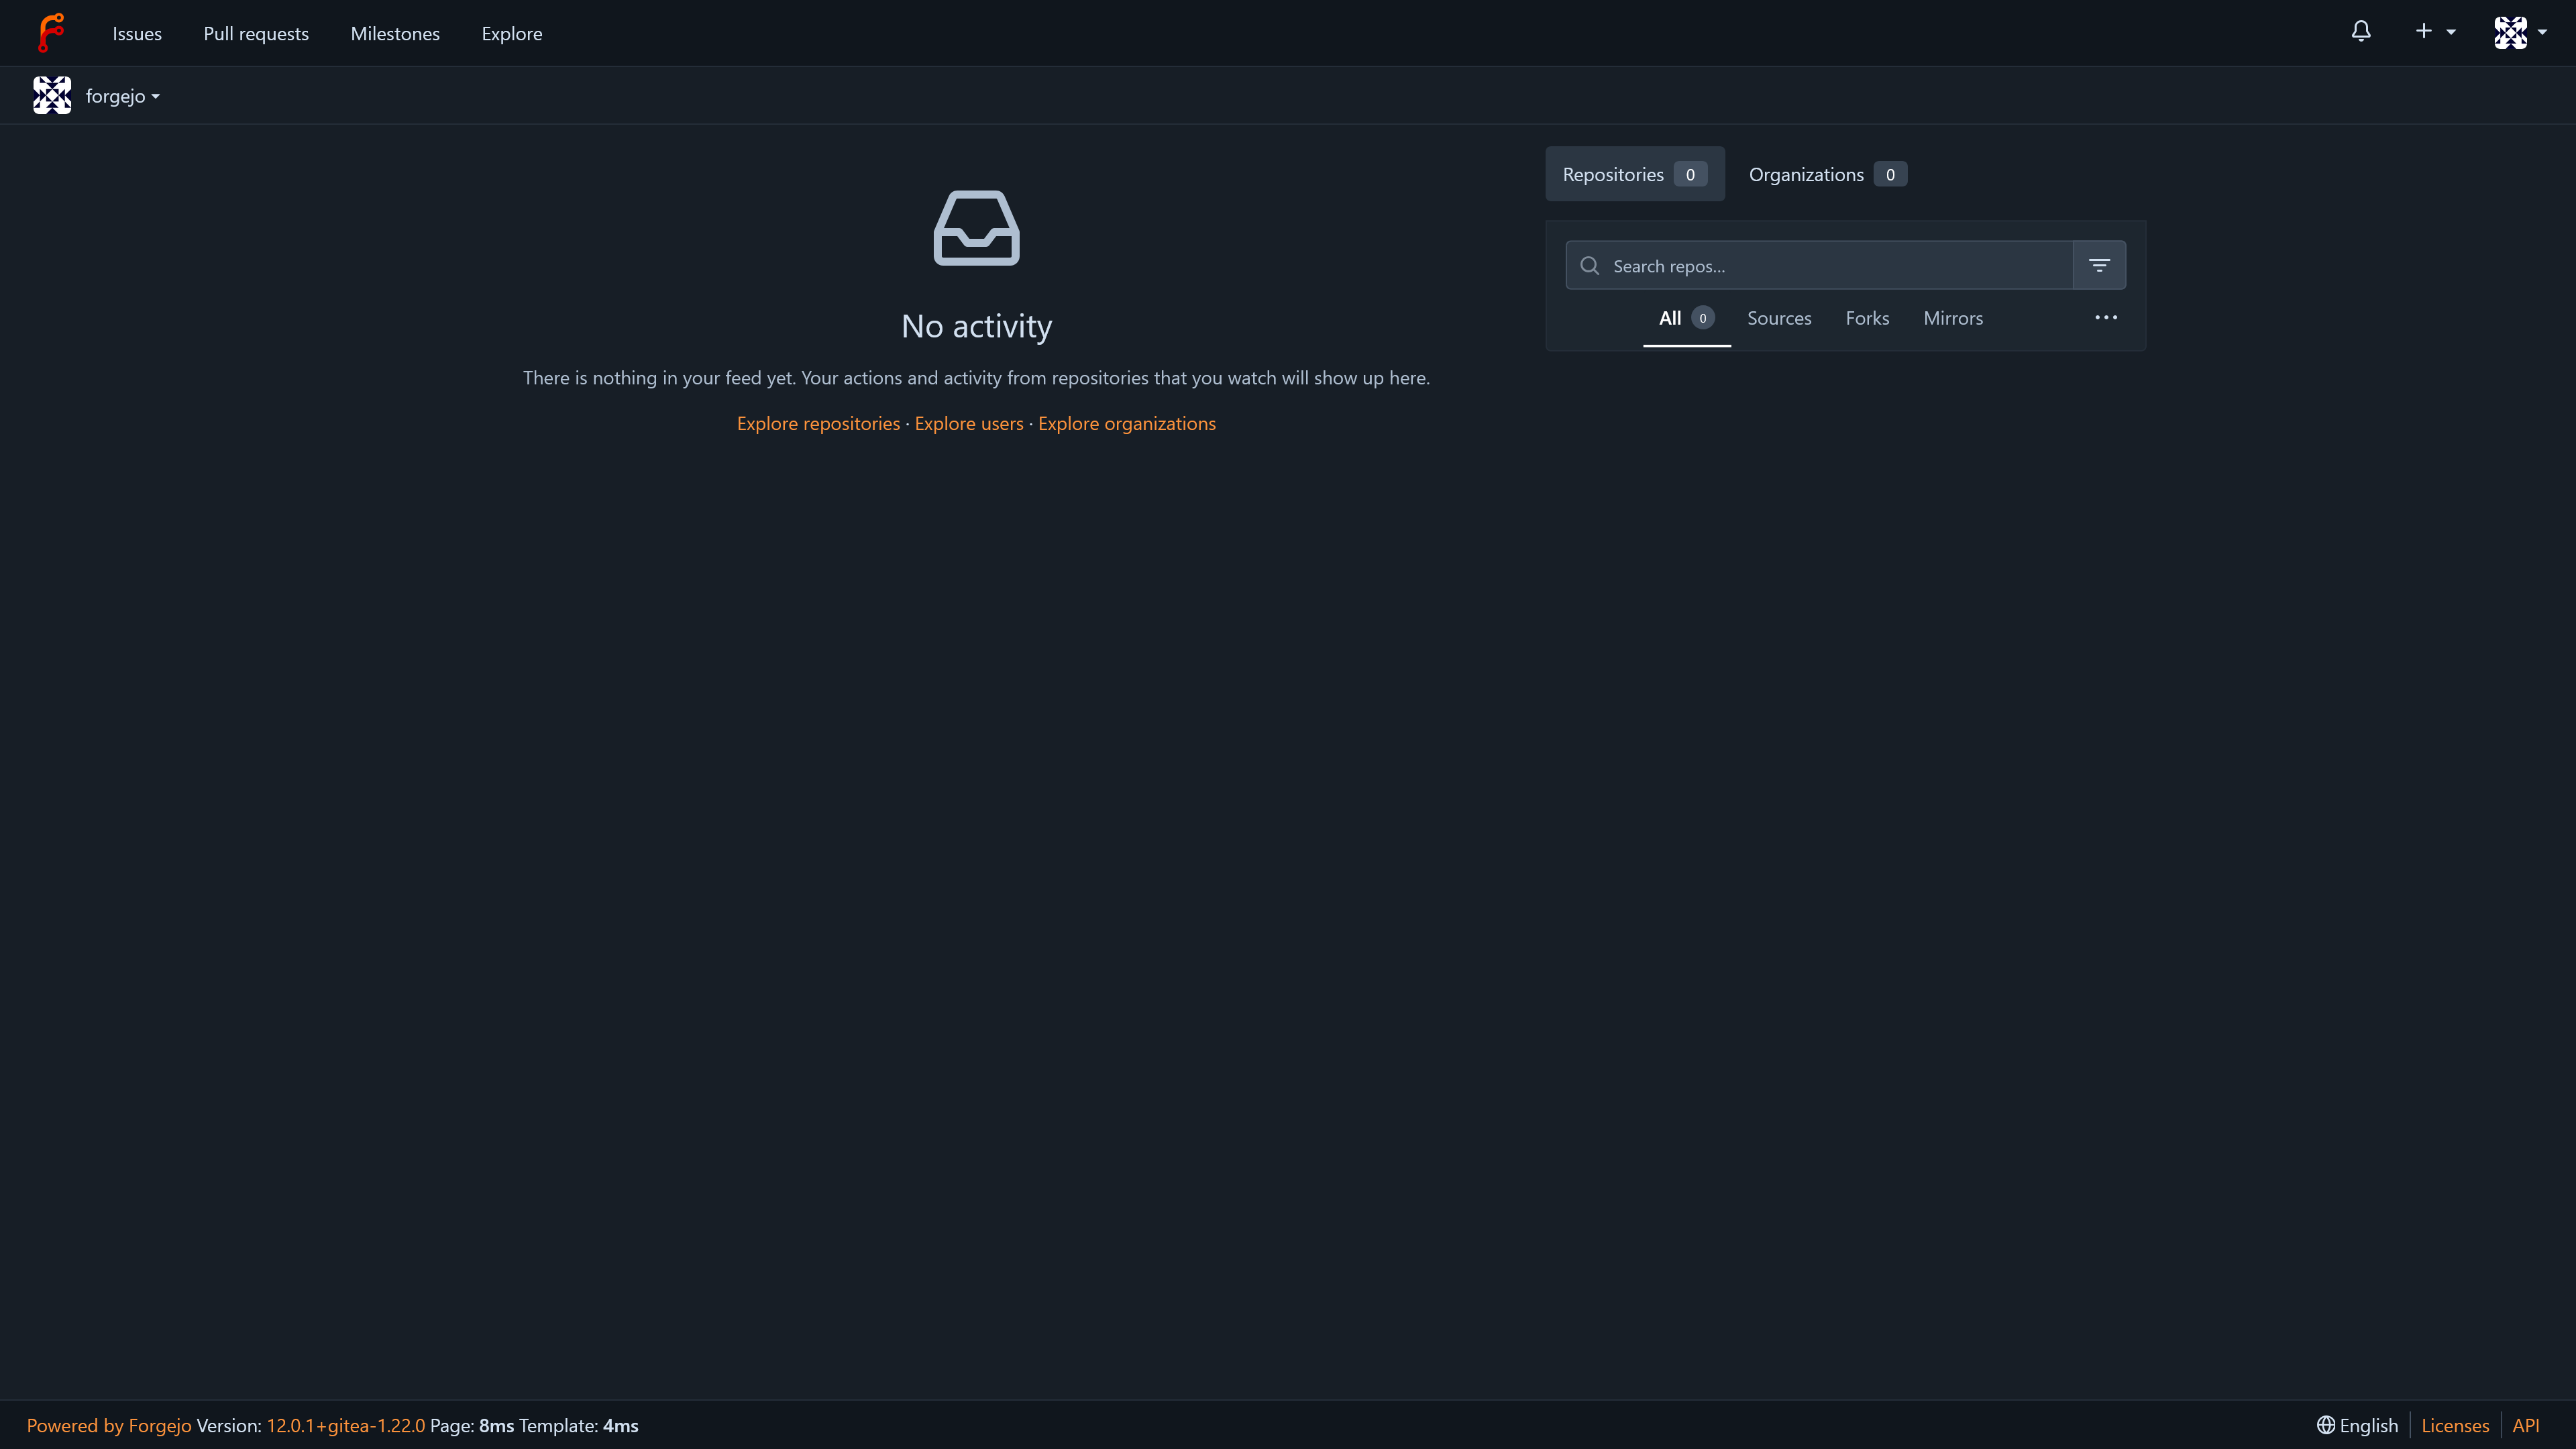
Whichever you chose, go ahead and fill in the details for your first user, click Install Forgejo and revel in the glory of your empty dashboard!
Additional Configuration🔗
With the initial configuration wizard done, the rest of the configuration is up to us. Realistically, you can go ahead and start using your Forgejo instance however you like, but I think there's some things that are best done as early as possible.
Important: Forgejo is a hard fork of Gitea, and because of that shared ancestry, the name Gitea will pop up frequently when poking around in the backend of things (like we are about to do). For example, Forgejo's primary /data directory has a folder inside of it called ./gitea which actually holds Forgejo's primary configuration. It's just something to be aware of, and don't worry about it too much.
Forgejo's configuration is generally handled in two places:
- A primary configuration file located at
/data/gitea/conf/app.iniwithin the container, with a matching location depending on your volume mapping outside of the container (mine is at/mnt/user/appdata/forgejo/data/gitea/conf.ini). - The admin panel in the web interface.
Most configuration is done in app.ini, but there are some exceptions. You can also reference the full set of config options for app.ini here because it is likely you will want to further customize your instance beyond what I suggest here.
In app.ini🔗
Important: Be sure to restart your Forgejo instance after making any of these changes!
Recommended changes🔗
-
[security]REVERSE_PROXY_TRUSTED_PROXIES =- Set this to the IP of your reverse proxy for additional security. If your reverse proxy and forgejo instance are both deployed via Docker, you can set it to the reverse proxy's IP on it's docker network.
-
[webhook]ALLOWED_HOST_LIST = loopback,private,*.yourdomain.com- this will allow your various other self-hosted services to use Forgejo's webhook features.
-
[migrations]ALLOWED_DOMAINS =- Set this to any external git providers you might be migrating repositories (likegithub.com,*.github.com). You can put the subdomain for you Gitea instance here as well if you are like me and planning to migrate data from Gitea to Forgejo.ALLOW_LOCALNETWORKS = true- Makes sure any local git providers you may want to migrate from are allowed (from stuff like NAT hair-pinning)
Optional changes🔗
-
[repository]DEFAULT_REPO_UNITS = repo.code,repo.releases,repo.issues,repo.pulls- Most repos I make don't need access to the full feature-set of Forgejo, so this is a more sane default to me (compared torepo.code,repo.releases,repo.issues,repo.pulls,repo.wiki,repo.projects,repo.packages,repo.actions). This just keeps the UI for a repo as minimal as possible.
-
[server]DISABLE_SSH = true- I use Forgejo exclusively over https, so I just turn this off.LFS_START_SERVER = true- Nice to have feature, I've used it in the past for game development projects that benefit from LFS features like file locking.
-
[other]SHOW_FOOTER_TEMPLATE_LOAD_TIME = false- I don't care to see this information personally.
Last Steps🔗
With most of the critical configuration out of the way, there's some things to do and check on.
Check the Mailer Works🔗
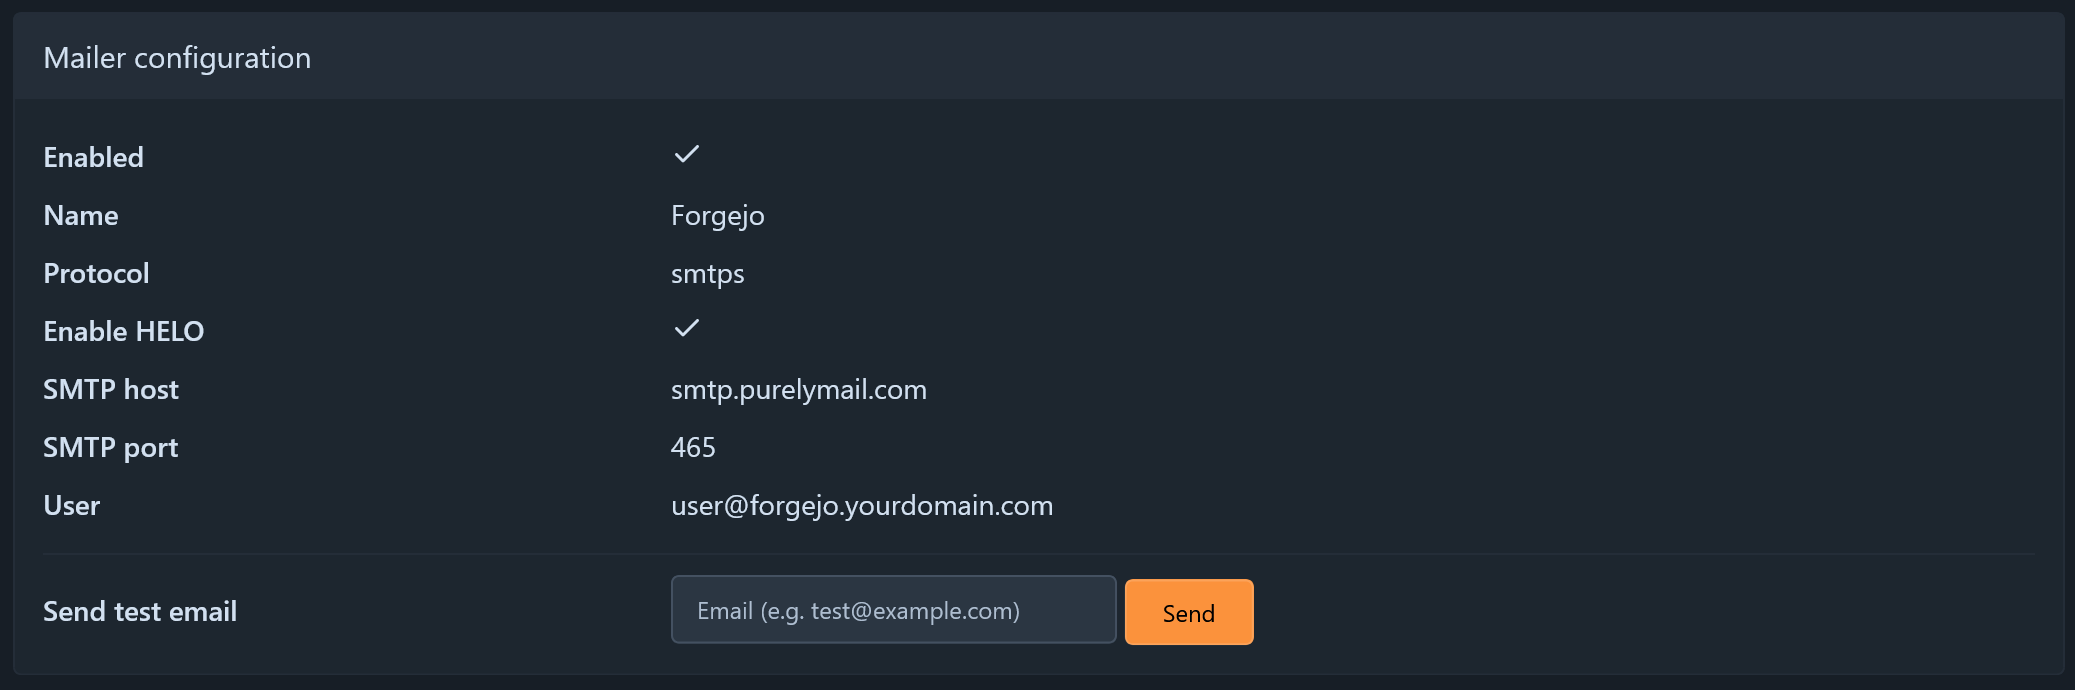
You can conveniently check if the email settings you put in during the setup wizard are working:
- Go to
Site Administrationfrom the profile button in the upper right of the screen. - Test your mailer configuration under
Configuration > Summary > Mailer Configuration. - There will be a field to type in an email address and send a test email.
You should receive an email from Forgejo at the email you specified! If this spits an error, you may need to take another look at the configuration for it in app.ini under the [mailer] heading (docs reference).
Create Additional Users (optional)🔗
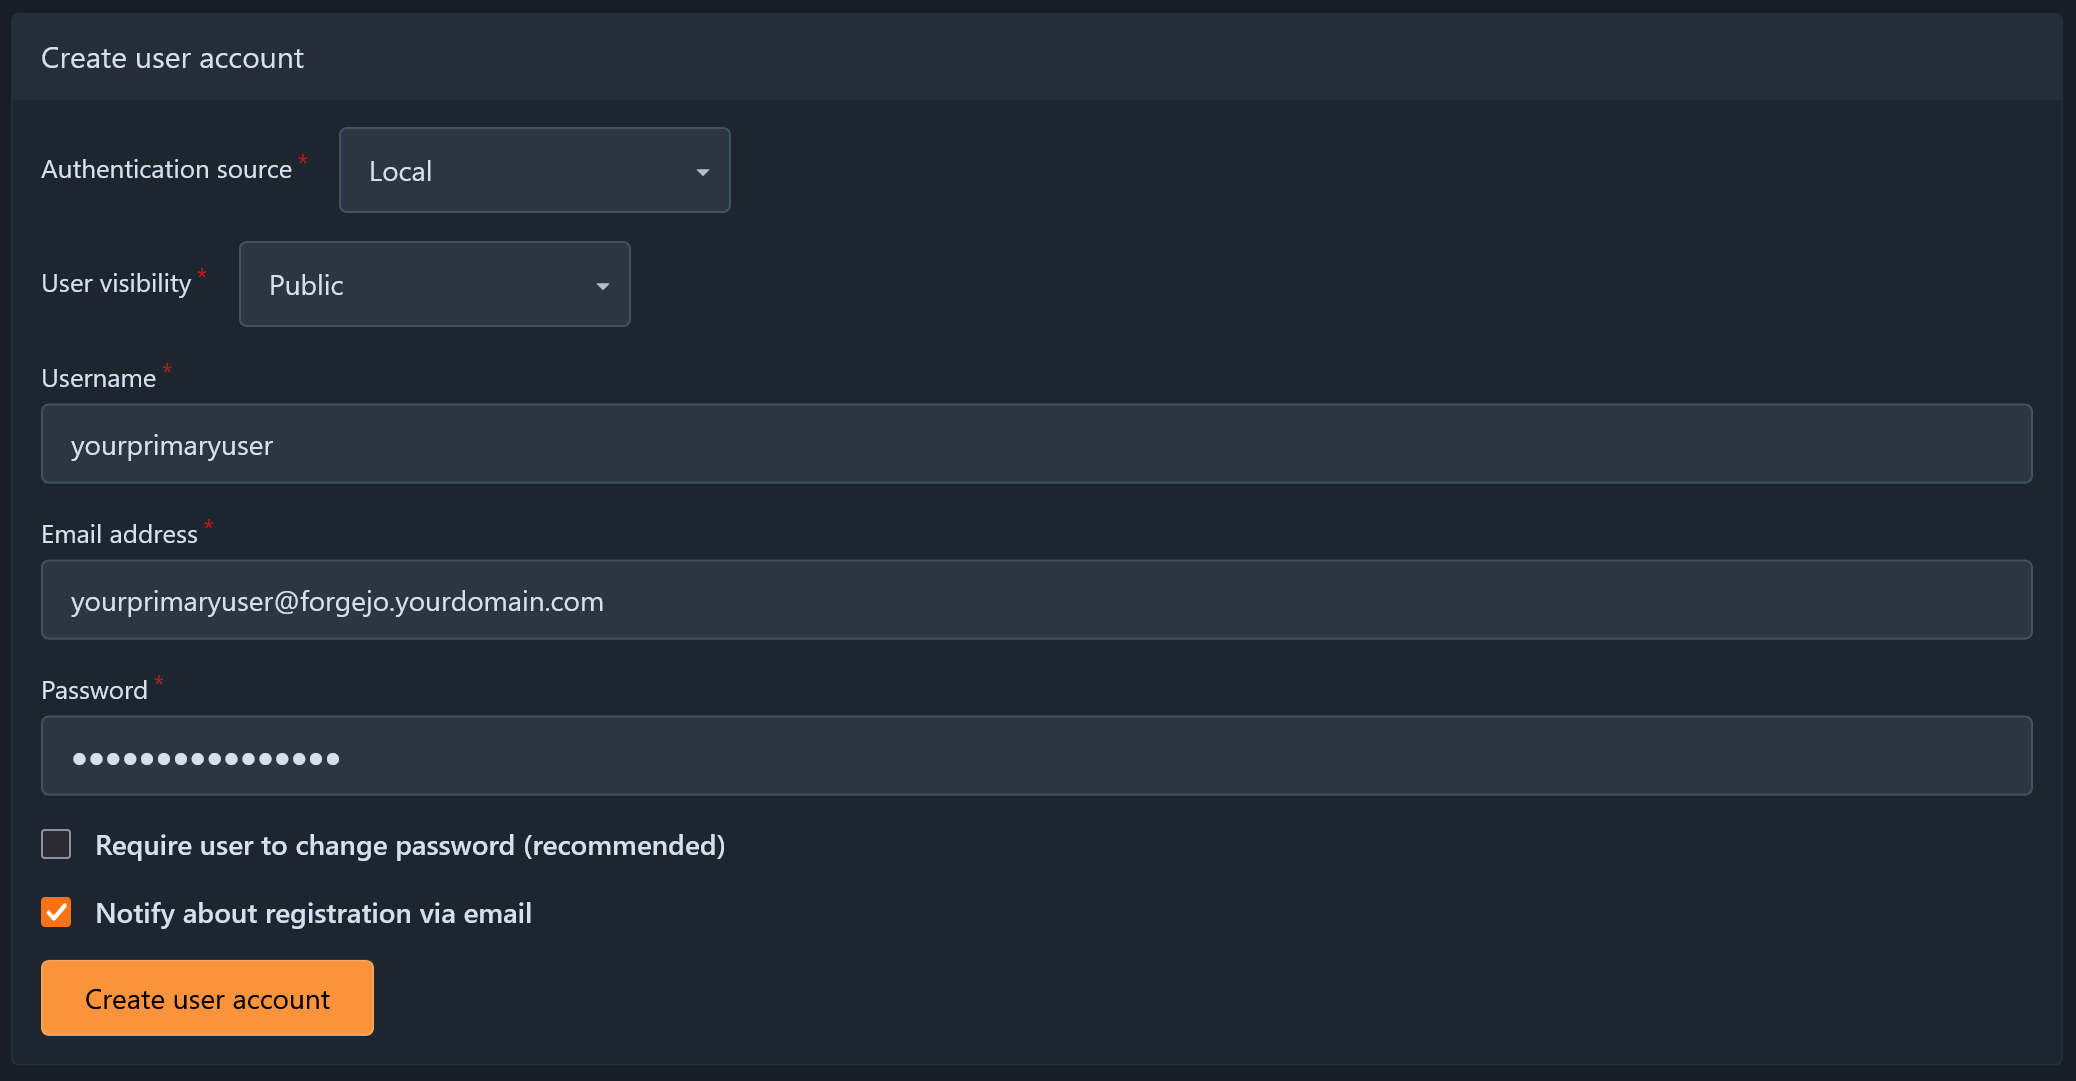
Important: If you plan on following the optional section later for setting up OIDC authentication, you can go ahead and skip this section or you can go ahead and create your desired users now and link them later on.
If you have additional people who will be using your Forgejo instance or you are creating a separate "primary" user for yourself in addition to the admin account, you can go ahead and those users now.
- Go to
Site Administrationfrom the profile button in the upper right of the screen. - Go to
Identity & access > User Accountsin the admin panel sidebar. - Click
Create user accountin the upper right. - Fill in the information for the new user, select desired options, click
Create user account.
Enable 2FA (optional)🔗
Important: If you plan on following the optional section later for setting up OIDC authentication, you can go ahead and skip this section if desired or you can go ahead and setup 2FA (our third party auth will bypass local 2FA regardless).
Two Factor Authentication should be used whenever possible, and Forgejo does support TOTP and WebAuthn methods of 2FA (in addition to third party authentication). If you don't intend on setting up third-party authentication, I strongly recommend that you configure 2FA for your administrator account at the minimum. Even if you aren't exposing your Forgejo instance to the internet, it's a simple way to harden the general security of Forgejo.
- Go to your account settings from the profile button in the upper right of the screen.
- Select
Securityin the left-hand sidebar. - Follow the steps for registering TOTP (authenticator app) and/or WebAuthn (passkeys) methods of 2FA.
Setting up Forgejo Actions🔗
Next up is setting up Forgejo Actions, which will allow you to run automated workflows, package builds, and a myriad of other cool things in Forgejo. This is necessary if you are coming from my previous guide on automating updates for your Docker containers. My configuration was built referencing Forgejo's documentation here.
Here is what we are adding to our previous Docker Compose configuration:
# docker-compose.yaml

services:
  # ...

  dind:
    image: docker:28.3.3-dind@sha256:c0872aae4791ff427e6eda52769afa04f17b5cf756f8267e0d52774c99d5c9de
    container_name: forgejo-dind
    privileged: true
    restart: unless-stopped
    command: ["dockerd", "-H", "tcp://0.0.0.0:2375", "--tls=false"]

  runner:
    image: code.forgejo.org/forgejo/runner:9.0.3@sha256:9ae7e65c14e7d49549432cbbbb2ed95e5e04ede234feb28bfd70a2dc04385263
    links:
      - dind
    depends_on:
      dind:
        condition: service_started
    container_name: forgejo-runner
    user: 1000:1000 # replace this with the UUID:GUID of the user you want to run the runner as
    environment:
      DOCKER_HOST: tcp://dind:2375
    volumes:
      # replace the left-hand side from the ':' with your own path
      - /mnt/user/appdata/forgejo/runner/data:/data
      - /mnt/user/appdata/forgejo/runner/config.yaml:/config.yaml
    restart: unless-stopped
    command: '/bin/sh -c "while : ; do sleep 1 ; done ;"'
    # command: '/bin/sh -c "sleep 5; forgejo-runner daemon --config /config.yaml"'
You can see here that we are running two additional containers. The first is called dind which stands for "Docker in Docker" - this is (I believe) supposed to be a more secure approach for to letting one container run other containers, as opposed to passing your host's docker.sock into the container via a volume mapping (which is how Gitea's docs set you up with Actions). The second is the runner which is what interfaces with Forgejo and orchestrates spinning up containers in dind to run your workflows, builds, etc. Deploying this is a two step process - so don't run docker compose up -d just yet.
Preparation🔗
Before we deploy the runner, we need to get a runner registration token from Forgejo. This can be done in one of a few places, depending on how you want to scope the runner to your Forgejo instance (reference). For this guide I will recommend registering your runner to the "Instance" level. To do this, go to Site Administration > Actions > Runners and click on Create new Runner and copy the token that displays in the popover. Save this for the next step.
Registering the Runner🔗
Before deploying the stack, we need to configure the runner.
-
On your host system, create the file
config.yamland the directorydataat the paths you specified in the volume mappings for the runner container. Make sure they have been given the correct permissions for the user and group you also specified in the compose file (chown 1000:1000 /mnt/user/appdata/forgejo/runner/data). -
On your host system, run
docker compose up -d -
On your host system, run
docker exec -it forgejo-runner /bin/sh -c "forgejo-runner register"to attach to the shell of the runner container. -
Inside of the runner container, follow the prompts of the registration script.
- Forgejo instance URL: You can either put the domain from your reverse proxy here (
https://forgejo.yourdomain.com) or use the internal hostname of your Forgejo instance (http://forgejo-server:3000). - Runner Token: Use the token obtained in the previous step
- Runner Name: Whatever you like
- Runner Labels: Set to
ubuntu-latest:docker:ghcr.io/catthehacker/ubuntu:runner-latest,ubuntu-22.04:docker:ghcr.io/catthehacker/ubuntu:runner-22.04,ubuntu-20.04:docker:ghcr.io/catthehacker/ubuntu:runner-20.04for best GitHub compatibility or check out the docs here about runner labels. You can change your labels whenever you want in your runner'sconfig.yaml.
- Forgejo instance URL: You can either put the domain from your reverse proxy here (
Hopefully all went well, and your runner successfully registers. You will be able to see this runner in the admin interface where you originally got the runner token.
Deploy the Runner🔗
The runner container will have automatically shut down after completing the previous step. Now we will edit the compose file to permanently deploy the runner. Comment (or delete) the first command: entry, and uncomment the second command: entry after the first. This changes how the runner starts up, and runs the runner 'daemon' rather than waiting for us to run the registration command. It should look about like this:
# docker-compose.yaml

services:
  # ...

  runner:
    image: code.forgejo.org/forgejo/runner:9.0.3@sha256:9ae7e65c14e7d49549432cbbbb2ed95e5e04ede234feb28bfd70a2dc04385263
    links:
      - dind
    depends_on:
      dind:
        condition: service_started
    container_name: forgejo-runner
    user: 1000:1000 # replace this with the UUID:GUID of the user you want to run the runner as
    environment:
      DOCKER_HOST: tcp://dind:2375
    volumes:
      # replace the left-hand side from the ':' with your own path
      - /mnt/user/appdata/forgejo/runner/data:/data
      - /mnt/user/appdata/forgejo/runner/config.yaml:/config.yaml
    restart: unless-stopped
    # command: '/bin/sh -c "while : ; do sleep 1 ; done ;"'
    command: '/bin/sh -c "sleep 5; forgejo-runner daemon --config /config.yaml"'
After this, go ahead and run docker compose up -d again, and your runner should be available to Forgejo within the admin panel!
If you arrived at this guide from my previous guide on automating updates for your Docker containers, you can go ahead and head back there to continue on with the guide after the section about deploying Gitea, since you have now setup Forgejo in it's stead. At the time of writing, the rest of that process should essentially be the same between Gitea and Forgejo. You can also continue on to further enhance your Forgejo instance with the following optional sections.

Setting up OAuth2/OIDC Authentication (Optional)🔗
If you run a lot of different self-hosted applications, user management and authentication can be frustrating. Some applications don't have authentication at all, others don't support best practices like 2FA, and its hard to feel confident that an application's authentication has been hardened enough to, for example, expose to the internet. Beyond that, if the user base of your self-hosted services is more than just you, you'll find yourself provisioning and managing accounts for the same users across multiple services.
Thankfully, Forgejo's built-in authentication system seems to be relatively robust. It supports features like 2FA and has great permissions control. Unfortunately it falls short in one way for me - you cannot enforce 2FA for all users (but that could be coming soon), which is important to me because my Forgejo instance is exposed to the internet (and I can't trust that the various friends/coworkers on my instance practice good password hygiene). Even then, it would be nice to have a more centralized authentication solution that can be used across a variety of my self-hosted services, Forgejo included.
Enter OAuth2 & OpenID Connect (OIDC) - this is a way to authenticate users via a third party, which you can self-host if desired or rely on an external service like GitHub or Google. You've likely seen on various websites the option to "Sign in with Google" or "Sign in with Apple" - the concept here is similar (or exactly the same in some cases). I'm not a cyber security expert, but my research has led me to believe that handling authentication in this way has a variety of benefits, specifically in regards to security. Forgejo supports a variety of third party authentication sources, OAuth2 and OIDC included.
This guide is already pretty long, so I won't go into setting up an authentication provider here (though I hope to make a separate guide soon). That said, for self-hosting, some options available to your are Authentik, Authelia, and Pocket ID. I've used both Authentik and Pocket ID, and I generally prefer the more opinionated and simple setup of Pocket ID, which is what I will be using as an example in this guide. Thankfully many of these open source authentication solutions have great wikis/docs and will often have application-specific setup guides. Pocket ID has a Forgejo specific guide that I will be referencing here and Authentik has a Gitea guide here that will work with Forgejo as well.
Adding an Authentication Source🔗
I'm going to jump ahead and assume you have configured an entry for Forgejo in your authentication provider using one of the guides available. In Forgejo, you will:
-
Go to
Site Administrationfrom the profile button in the upper right of the screen. -
Go to
Identity & access > Authentication sourcesin the admin panel sidebar. -
Click
Add authentication sourcein the upper right corner. -
Select:
- Authentication type: OAuth2
- Authentication name: The name of your authentication provider
- OAuth2 provider: OpenID Connect
You will then populate the rest of the information as recommended by your Authentication Provider. If you are using Pocket ID, your inputs will look similar to mine:
- Client ID (Key): Your client ID from Pocket ID
- Client Secret: Your client secret from Pocket ID
- Icon URL:
https://pocketid.yourdomain.com/api/application-configuration/logo - OpenID Connect Auto Discovery URL:
https://pocketid.yourdomain.com/.well-known/openid-configuration - Skip local 2FA:
true - Additional scopes:
openid email profile - Public SSH key attribute: Leave this blank/as-is
- This authentication source is activated:
true
You may have noticed that I glazed over quite a few options in the middle there that pertain to claims/groups. You can either leave these blank, or configure these claim values in your authentication provider - I would classify these options under "advanced" configuration. These claim/group options are the method by which Pocket ID/Forgejo can communicate various things about a user, like if they are an admin, or a restricted user, or can even access Forgejo. There isn't a ton of documentation about how this feature works, but I've confirmed that the following configuration works if you create groups forgejo_users, forgejo_admins, and forgejo_restricted in your authentication provider (and assign users to them accordingly).
- Additional Scopes:
openid email profile groups - Required claim name:
groups - Required claim value:
forgejo_users - Claim name providing group names for this source. (Optional):
groups - Group claim value for administrator users. (Optional - requires claim name above):
forgejo_admins - Group claim value for restricted users. (Optional - requires claim name above):
forgejo_restricted
Configure Third Party Registration🔗
Since we want users configured in Pocket ID to automatically have access to Forgejo, we want to tweak the configuration in regards to registration:
Set/add the following options under [service]
DISABLE_REGISTRATION = falseALLOW_ONLY_EXTERNAL_REGISTRATION = true
Now your users configured in Pocket ID will have an account created for them when they sign in to Forgejo for the first time.
The Result🔗
If you are following the recommendation to have separate admin and primary users for yourself, you can use this opportunity to test out your OAuth2 configuration!
In Pocket ID:
- Ensure you have created 2 users
forgejo(your admin user) and then a second user likenickfor your primary account. Make sure to setup credentials/passkeys for both of these users. - Assign both of these users to a group called
forgejo_users - (optional) If you configured the additional claims earlier, assign your
adminuser to a group calledforgejo_admins - In the settings for the OIDC Client you made for Forgejo, make sure your
forgejo_usersgroup is selected under the "Allowed User Groups" - Sign out of Pocket ID
In Forgejo:
- Sign out of Forgejo
- Restart your Forgejo instance's container (to apply the configuration changes we made earlier)
- Once Forgejo is back up, click on
Sign In
You should be greeted by a dialog the offers only to sign in via Pocket ID (or whichever authentication provider you configured) - click on that button.
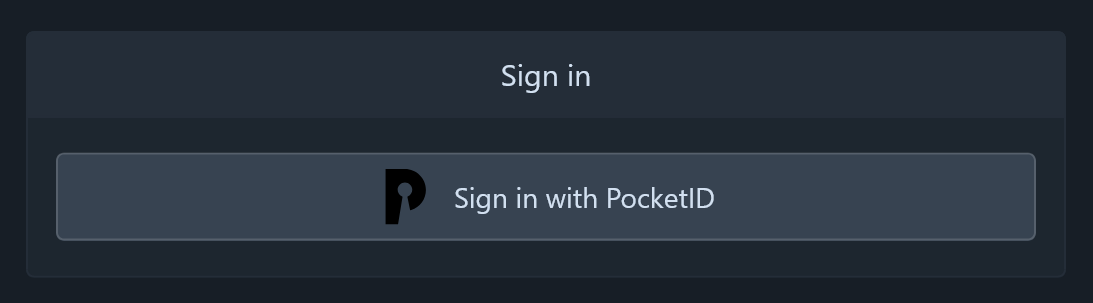
You will then be redirected to Pocket ID for authentication. Choose to sign in with your primary/personal user's passkey (not your admin user).

Following authentication, you will be redirected back to Forgejo, which will prompt you to confirm the information for the new user. Click Complete account.
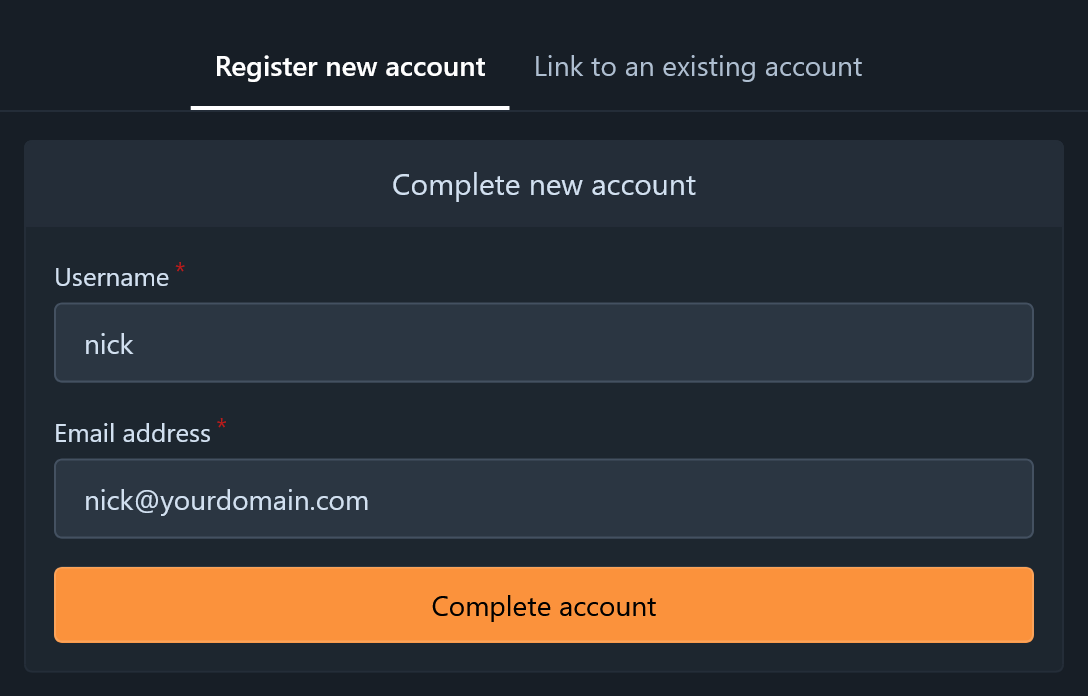
Your primary user should have been successfully created and authenticated! If you went with the recommendation to have a separate admin user or only created one user:
- Log out of Forgejo and Pocket ID
- Repeat these steps for signing in, but sign in with your admin user's passkey
- Select
Link to an existing accountrather thanRegister new accountand provide the login information for the admin user you created in the setup wizard.
Now your existing admin account will be linked to the authentication info provided by Pocket ID!
Migrating Repos from Gitea or other Git Providers (Optional)🔗
Important: Before proceeding with this process, make sure you have recreated any users & organizations that were on your prior Gitea instance within Forgejo so you can assign ownership of repositories to the correct entities. I recommend doing this process from a user with admin privileges.
As mentioned at the start of the article, there is no direct way of migrating from Gitea to Forgejo at this point. That said, you can use Forgejo's built in migration tool to import repos from a variety of sources like GitHub, GitLab, other Forgejo instances, and of course Gitea. By using this tool, you are able to preserve the entire history of a repo from Gitea, including information not stored in the raw Git repo like Issues, Pull Requests, etc. Unfortunately, not everything transfers - for example, prior commits are not added to the "activity history" for your user, so your commit graph from Gitea (if that is something you care about) will not transfer over. You can see that my commit graph is empty prior to ~May this year when I migrated in the image below:

Realistically, the most important information gets transferred over (your repos and their associated information), so I think this is a pretty good solution for migrating from Gitea given the "native" method is no longer possible. Unfortunately, there doesn't seem to be a good way to "bulk" migrate many repositories at once, so you'll have to do this by hand per-repo that you wish to migrate.
Getting an Access Token from Gitea🔗
To migrate the maximum amount of data from Gitea, we will need to create an access token for a user in Gitea. Just like I recommend performing this process in Forgejo from an admin user, I recommend making your Gitea access token from an admin user as well. So head over to your existing Gitea instance and sign in as the relevant user.
-
In Gitea, go to your account settings from the profile button in the upper right of the screen.
-
Select
Applicationsin the left-hand sidebar. -
Focus on the
Generate New Tokendialog in theManage Access Tokenssection. -
Select the following options:
- Token Name:
Forgejo Migrations - Repository and Organization Access:
All (public, private, and limited) - Select permissions: Set all options to
Read
- Token Name:
-
Click
Generate Tokenand copy/save the resulting token (in a blue box at the above theManage Access Tokenssection) for later use.
Setting up Migrations🔗
Back in Forgejo, click on the + icon in the upper right of Forgejo and select the option for New migration. This will take you to a screen where you can select from a variety of Git providers. Go ahead and select Gitea and then fill out the form with the following options:
-
Migrate / Clone from URL: Set to the URL of the specific repo you wish to migrate.
-
Access Token: Set to the access token obtained from Gitea in the previous section.
-
Migration options
- This repository will be a mirror:
false - Migrate LFS Files:
trueif your repo has files in LFS (generally safe to leave on anyways).
- This repository will be a mirror:
-
Migration items: Set each option to
trueas needed/if desired. -
Owner: Set to desired the user/organization if available. If not, you can transfer ownership later.
-
Repository name: Leave as-is
-
Visibility - Make repository private: Set as desired/leave as-is
-
Description: Leave as-is/blank (to import the description automatically)
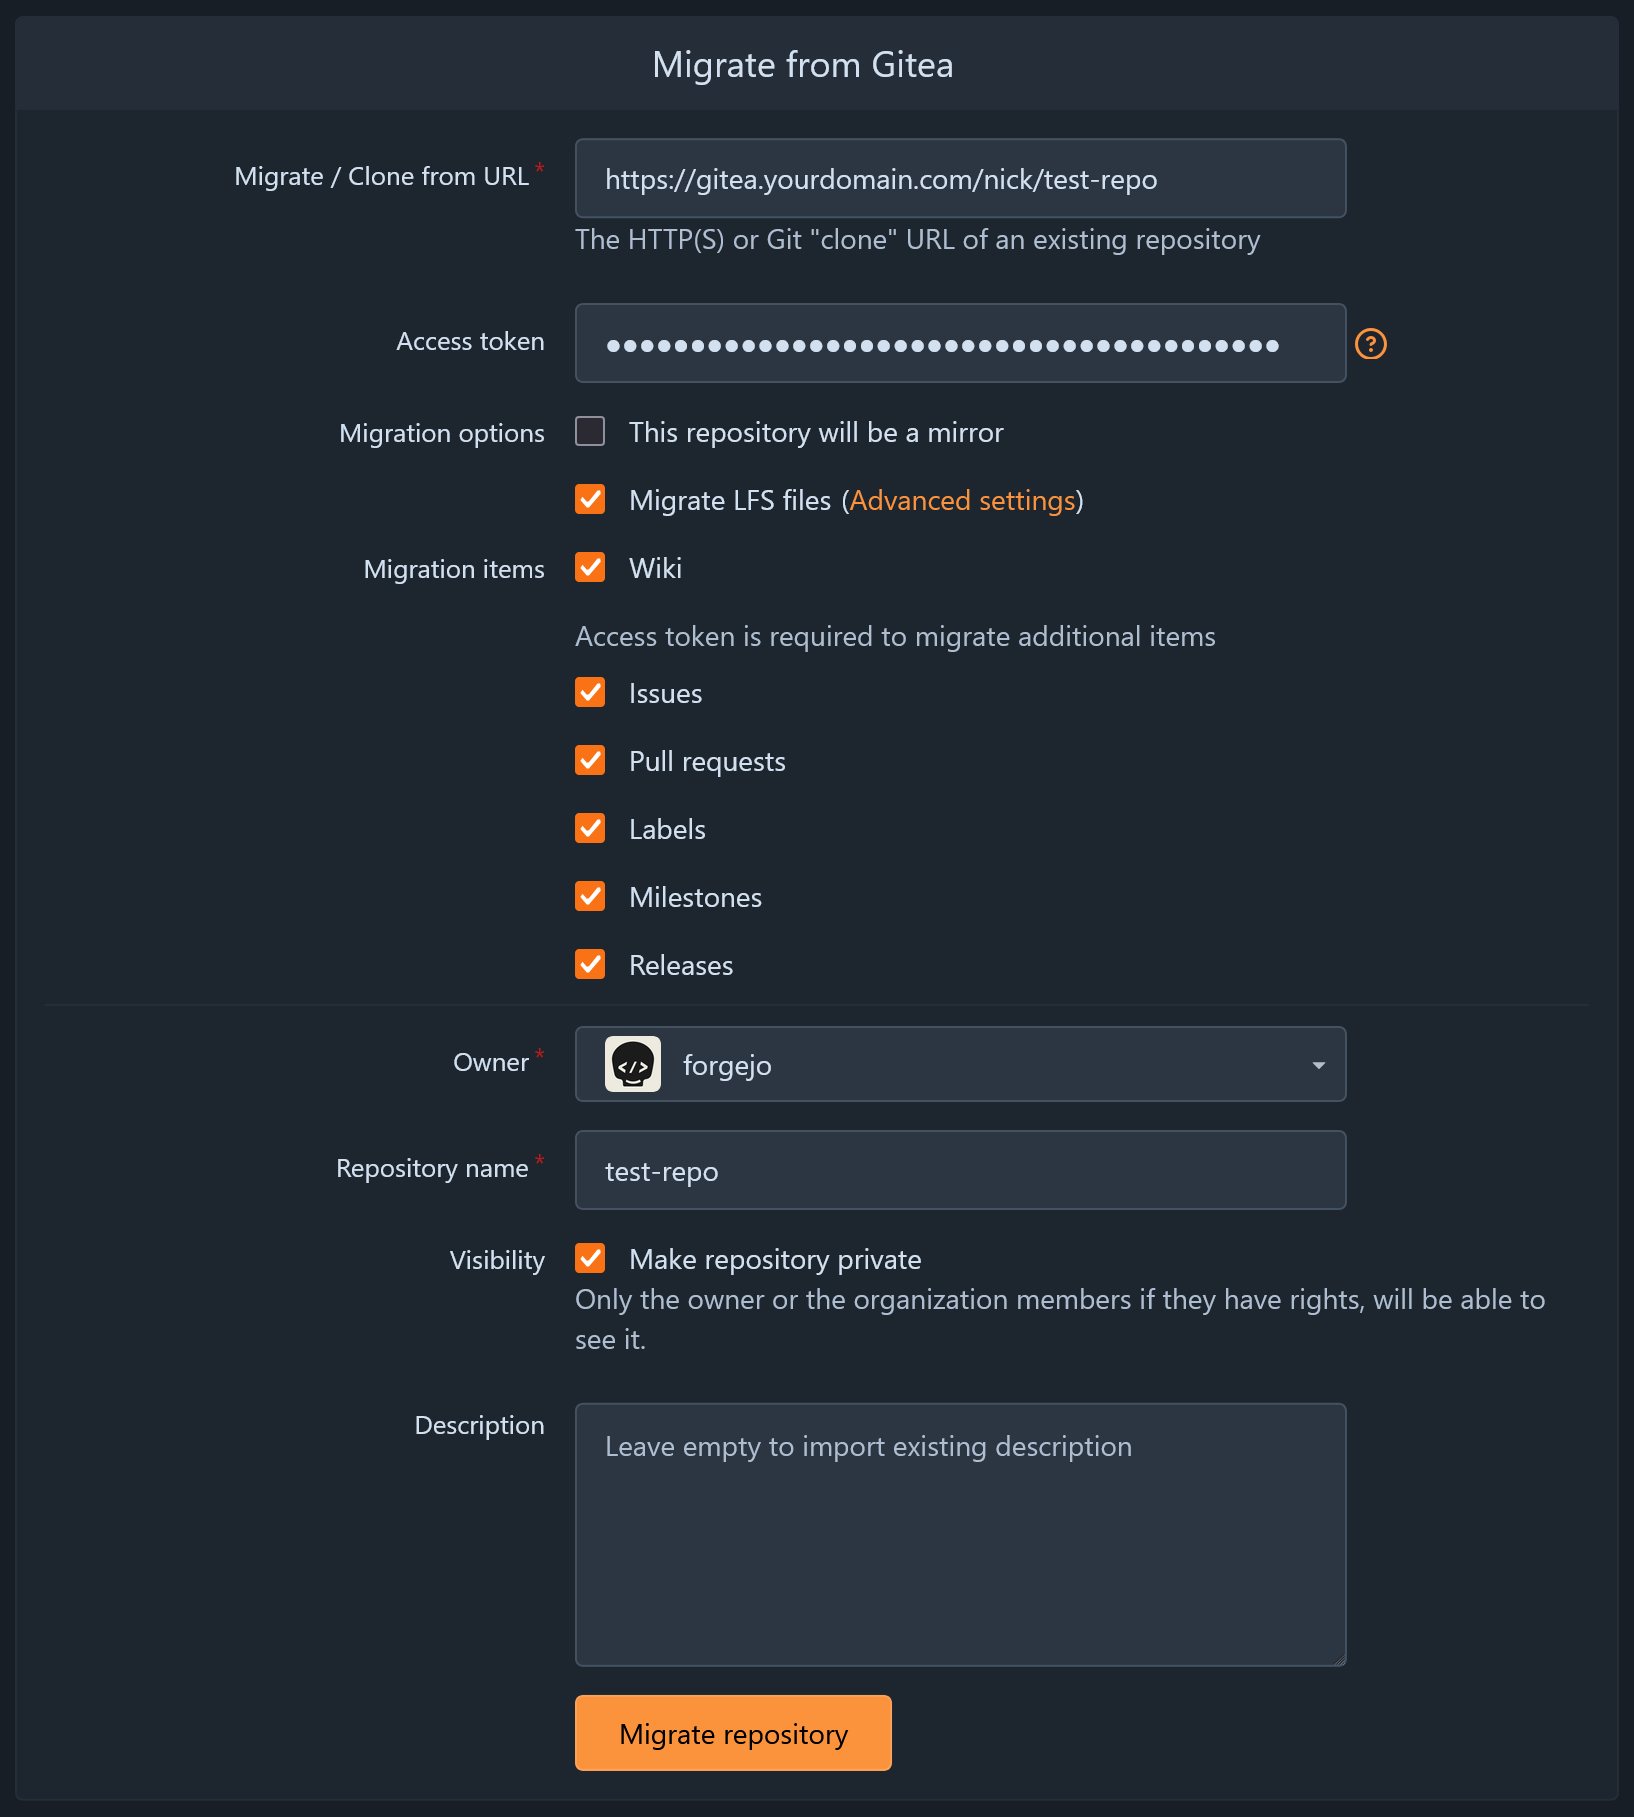
Once you click Migrate repository, it will process the migration (might take a while, depending on the size of the repo) and redirect you to the repository's main page. At this point, you will want to go into the repository's settings and configure it as desired - transfer ownership to the correct user, set preferred pull request settings, etc. It's also worth double checking and making sure everything transferred correctly. You will have to repeat this process for each repo you would like to transfer (unfortunately). Fingers crossed you don't have too many repos to transfer! While this process isn't as convenient as a more direct migration that was previously available, I found that the end result was perfectly acceptable.
Once you finish migrating all repos, it would be best to shutdown and retire your Gitea instance.
Setting up GPG Commit Signing (Optional)🔗
Disclaimer: This setup is the most optional of all the sections in this guide.
Lets look at a potential problem with how Git works - when you are first configuring Git, it will likely ask you to provide both your name and email. Due to the decentralized nature of how Git works, there's no way to ensure you are who you say you are - for example, I could put in your name and email into my Git config and start to masquerade as you! GPG commit signing is a way to attach a secure, key-based signature to your commits, which can then be verified by a Git provider like Forgejo or GitHub. If you use an SSH key for accessing your home-lab/server, GPG keys are similar in many ways - you can find a good explanation by GitHub here and another overview by Codeberg here. While the benefits that commit signing provides are less important in a home setting, (hence the optional aspect of this section) its something I've configured for myself since my global Git configuration is already setup to sign commits.
There are two levels to this in Forgejo:
- Setting up Forgejo to verify your own signed commits.
- Setting up Forgejo to sign off on the commits it makes on your behalf from places like the Web UI when merging a pull request, for example.
Your Commits🔗
If you have not setup commit signing before, you will likely want to repeat this process once per device that you might be making commits from (desktop, laptop, etc).
Generating Your GPG Keys🔗
The first step is to generate a GPG key pair, which I will be doing via GnuPG. I do most of my development work from a Windows desktop machine, so I opted to install it via WinGet, which is an actually pretty fantastic package manager (like apt, dnf, etc on Linux) that I think not enough people are using/aware of. If you are also on Windows, you can likely put the following command into your terminal:
# Windows
winget install GnuPG.GnuPG
For Linux, you can likely use your distro's package manager, and on mac you can use brew:
# Linux (Debian)
sudo apt install gnupg

# MacOS
brew install gnupg
After that, you can generate a GPG key pair by following this great guide from GitHub. Sorry to redirect you to another source, but I think this is ground I don't need to re-tread here. You can mostly stick to the defaults, but here are some choices you can make here - the length of time your key will be valid for and whether or not to add a passphrase.
I'm not a cybersecurity expert, so I don't take my advice on these matters wholesale. That said, for length of time, it seems about a year is frequently recommended, and a passphrase is better than no passphrase. Both of these options are part of the classic convenience vs. security compromise, so make choices that fit your preferences. Personally, I don't use a passphrase (to avoid having to enter it when making commits), which seems to only be an issue if someone else comes into possession of your private key. For my use case (at home), I don't intend on ever having my private key exposed, and the only way that would happen was something like a trojan horse. If I have a trojan horse, all the attackers would have to do is wait for me to enter the passphrase and grab the decrypted private key from cache anyways. I know this isn't the best practice, but it's where I'm at right now, and doing things better isn't a huge priority for me right now.
Important: Be sure to take note of your GPG key's ID, which you can get via gpg --list-secret-keys --keyid-format=long. We will need this ID several times throughout the rest of the process.
Setup Commit Signing🔗
Once you have generated your key, you need to tell Git to sign commits with it. Similar to the previous step, GitHub has a great guide on doing this here. The most important steps of this process are:
- Get the ID of your key with
gpg --list-secret-keys --keyid-format=long - Tell Git you have a GPG key with
git config --global user.signingkey <your signing key id here> - Tell Git to sign all commits and tags with the afore-specified key with
git config --global commit.gpgsign true && git config --global tag.gpgSign true
Now, when you make a commit, it will be signed with a unique signature derived from your GPG key pair's private key.
Tell Forgejo About Your GPG Key🔗
If you push a signed commit to your Forgejo instance at this point, it won't know what to make of it. To tell Forgejo about it, you need to add your GPG key pair's public key to your user's profile. If you followed the recommendation to have a separate admin and personal user accounts, you'll probably want to do this process from your personal account.
-
Get the ID of your key with
gpg --list-secret-keys --keyid-format=long. -
Get the public key of your GPG key pair with
gpg --armor --export <your key id>and copy it to your clipboard.- It will start with
-----BEGIN PGP PUBLIC KEY BLOCK-----and end with-----END PGP PUBLIC KEY BLOCK------ be sure to include these in your selection.
- It will start with
-
In Forgejo, go to your account settings from the profile button in the upper right of the screen.
-
Click on
User settings > SSH/GPG keysin the sidebar. -
Click
Add keyin the upper right of the screen. -
Paste the public key you copied earlier into the text box.
-
Click
Add keybelow the text box.
Now when you push a signed commit to Forgejo, it will cross reference the signature with your public key and know that commit was made by you. If everything has been configured properly, you'll see a green lock icon appear next to any commits (both prior and future) signed by your GPG key.
Forgejo's Commits🔗
When you perform certain actions in Forgejo's web interface, Forgejo will be making those commits for you on your behalf. If you have gone to the trouble of setting up GPG commit signing for yourself, you'll probably be frustrated to know that the visibility of that information is "lost" when performing certain actions, like squashing the commits in a pull request, since Forgejo itself doesn't have GPG key commit signing enabled by default. Thankfully we can enable this, following a similar process as when we setup our own GPG keys. I'll be honest, getting this setup is a bit of a pain in the ass because (at the time of writing) Forgejo's docs don't do a great job of explaining the process. I initially referenced this guide at ipetkov.dev when I was getting this figured out. If you want a more comprehensive take on this process, and probably a more secure configuration, go take a look over there!
Before proceeding, I recommend setting the GPG home directory via an environment variable in your Docker Compose file. This ensures that your GPG key data will be stored within the data directory that we have already mapped to the container. Add the following to your server's environment: section:
# docker-compose.yaml

services:
  server:
    # ...
    environment:
      # ...
      - GNUPGHOME=/data/gitea/home/.gnupg
Generating Forgejo's GPG Keys🔗
We will need to generate another key-pair for Forgejo to sign commits with. Thankfully we can do this from inside of Forgejo's container by attaching to it's shell on your host system as the git user:
docker exec -it --user git forgejo-server /bin/bashNow we will follow the process from before to generate a new GPG key with gpg --full-generate-key:
-
When presented with
Please select what kind of key you want:we only need a key for signing, so you can select(10) ECC (sign only) -
When presented with
GnuPG needs to construct a user ID to identify your key., we want to indicate that this key belongs to Forgejo.- If you followed the earlier advice to have separate admin and personal user accounts in Forgejo, putting in the username and email you provided for that user is a great option that will allow us to do something nice later.
-
Don't enter a passphrase. As far as I can tell (again I'm not a cybersecurity expert), it has to be this way because Forgejo cannot be configured to provide the passphrase for the pinentry prompt.
- It may be possible to provide a passphrase through a file and using GnuPG's --passphrase-file argument. This would require additional configuration with both Git and Forgejo that I haven't looked into. If anybody reading this knows more about doing this better, I would love to hear your thoughts.
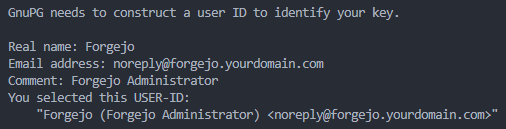
- After generating the new key, take note of the key's ID with
gpg --list-secret-keys --keyid-format=long
Telling Forgejo Sign Commits🔗
Now we have generated a key for Forgejo to sign commits with, we need to configure Forgejo to use it. To do this:
-
Head over to your
app.iniconfiguration file. -
Find (or create) the heading
[repository.signing].- Set
SIGNING_KEY =to the ID of the GPG key you just generated. - Set
SIGNING_NAME =andSIGNING_EMAIL =to the name name and email you specified in your GPG key.
- Set
-
Additionally, we need to tell Forgejo when to sign the commits it makes. I will recommend setting all of these options to
pubkeyso commits are only signed for user's who have GPG keys added to their account, but you can read more about the available options over at Forgejo's docs.- Set
INITIAL_COMMIT = pubkey - Set
WIKI = pubkey - Set
CRUD_ACTIONS = pubkey - Set
MERGES = pubkey
- Set
-
Restart your Forgejo instance for these configuration values to take hold.
Now if you perform a git operation in Forgejo's web interface from the user that you added a personal GPG key to (or that meet the criteria that you configured in app.ini), Forgejo will sign the commits that it makes on your behalf with they key that we configured!
Provide Forgejo's Public Key to the Admin User (Optional)🔗
If you followed the recommendation to have separate admin and personal users and you used the admin user's email for Forgejo's GPG key, you can enhance the presentation of Forgejo's commit signing. To do this:
-
Sign into Forgejo as your admin user
-
Enter the shell of your Forgejo container as the git user again (
docker exec -it --user git forgejo-server /bin/bash). -
Get the ID of your key with
gpg --list-secret-keys --keyid-format=long. -
Get the public key of your GPG key pair with
gpg --armor --export <your key id>and copy it to your clipboard.- It will start with
-----BEGIN PGP PUBLIC KEY BLOCK-----and end with-----END PGP PUBLIC KEY BLOCK------ be sure to include these in your selection.
- It will start with
-
Back in Forgejo, go to your account settings from the profile button in the upper right of the screen.
-
Click on
User settings > SSH/GPG keysin the sidebar. -
Click
Add keyin the upper right of the screen. -
Paste the public key you copied earlier into the text box.
-
Click
Add keybelow the text box.
Now the Forgejo will associate it's own signed commits with your admin user, which I think is a clean way of doing things. Bonus points, if you provide a profile picture for your admin user, it will show that with your signed commits.
Conclusion🔗
Important: You can find the finished docker-compose.yaml file for this setup here.
Welcome to the end of this guide! Whether or not you followed every section of this guide, at this point you'll have setup a very capable and reliable Forgejo instance that leverages the best features the project has to offer. If you are finding yourself getting deeper into the world of self-hosting and running more than a handful of services, I think setting up something like Forgejo is a no-brainer. At a bare minimum, storing your Docker Compose config files in a Git repo gives you essential features like a full version history, the ability to roll back changes, and separating WIP changes via branches. Additionally, you can use your repo's Issues tab to plan and keep track of tasks that pertain to your self-hosted services, or use the Wiki tab to start documenting various aspects of your setup. On a more advanced level, the world of CI/CD is open to you now, and you can achieve a variety of cool and useful things with Forgejo Actions.
Personally, my Forgejo instance is the cornerstone of my home-lab and self-hosted services, but I also use my Forgejo instance for a variety of other purposes:
- I have setup pull mirrors for a variety of public and private repos of mine that are hosted on GitHub, sort of as a backup, but mostly to just always have a mostly up-to-date copy locally.
- I have setup pull mirrors for a variety of other open source projects in the name of "data preservation" - in the event that they don't exist anymore for one reason or another I would still have a recent version locally.
- If I'm learning something new in software development, or toying with a new idea or personal project that might not see the light of day, I tend favor the privacy my Forgejo instance offers in comparison to GitHub.
- I offer up access to my Forgejo instance to close friends, coworkers, and peers as a place where they can work on personal projects free of restrictions like private repo limitations or expensive LFS storage.
As a final note - please, please, please - if you find that Forgejo becomes a critical service for you (and especially if you are hosting others' work), make sure you are practicing good backup hygiene! As nice as it is to have control of your own data, it means that data loss is a far greater possibility unless you are putting the work in to protect it. How you go about doing this will be different depending on what your overall setup looks like. Personally, I use Unraid's Appdata Backup plugin to stop and backup all of my containers every night and keep about 2 weeks worth of backups on rotation. Then I use Duplicacy to backup those backups to various off-site storage endpoints (Backblaze, Google Drive, etc). Stay safe out there!