Netlify doesn't support running builds/deploys when pushing tags or releases on GitHub. Thankfully you can work around this with a little bit of GitHub Actions magic!
Prerequisites🔗
- A GitHub Account with GitHub Actions access
- A Netlify Account with a Website linked to the target GitHub Repo
The Solution🔗
Because Netlify doesn't support deploying based on tags or releases, we have to use another solution. Initially I had looked into using GitHub's support for Webhooks to trigger a build using Netlify's Build Hooks, but there are limitations on how specific you can get with the triggers. In this case, you can trigger a webhook when anything pertaining to a GitHub release gets changed, but not speficially when publishing a release. So builds would get triggered when you save a release draft, or even delete a release - not good.
Thankfully GitHub actions can come to the rescue here. You can be specific with GitHub Actions triggers, so we can do something when specifically publishing a release, like so:
on:
  release:
    types:
      - published
There are a few ways at this point that you could use GitHub Actions to trigger a deploy build, but I decided on the following approach:
- Set up a separate branch
prodthat is set in Netlify as the Production branch (builds automatically will publish from this branch when it is updated). - Use GitHub actions to run a workflow when publishing a release. The workflow will force update the branch
prodto the git tag set by the release.
The Workflow🔗
In your GitHub repo, create a new workflow at .github/workflows/on-release.yaml. Paste the following contents in the file:
name: On Release

on:
  release:
    types:
      - published # Run this workflow on release publish

jobs:
  update-prod:
    name: Update Production Branch (Trigger Netlify Deploy)
    runs-on: ubuntu-latest
    permissions:
      contents: write # Give GitHub Actions write permission to the repo
    steps:
      - name: Checkout Prod
        uses: actions/checkout@v4
        with:
          fetch-depth: 0
          ref: prod # Checkout the prod branch (change this if you branch isn't named prod)
      - name: Update Prod to Current Release
        run: | # Hard reset the prod branch to the release's tag ref, and force push it to the repo
          git reset --hard ${{ github.event.release.tag_name }}
          git push -f
Once you commit the file to your repo, the workflow should successfully run when you publish a new release!
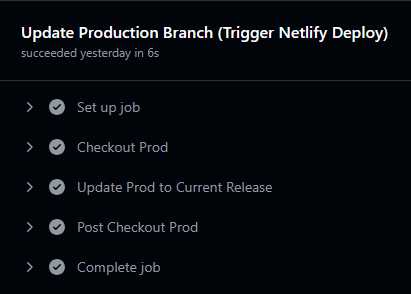
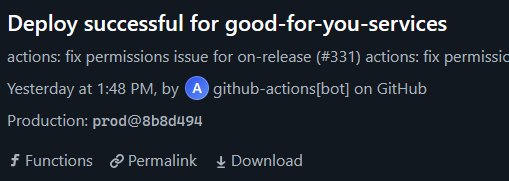
Then, once the branch prod is updated, Netlify should automatically trigger a production deploy build.
Improvements🔗
At this point, everything should be working great, but there are some ways to improve this setup.
Setup Branch Protection Rules🔗
Because our branch prod is effectively a "dummy" branch that no one should ever be directly committing to, we should set up a branch protection rule to ensure mistakes aren't made. In your repo's settings, go to Settings > Rules > Rulesets and click on New ruleset > New branch ruleset. Configure it as follows:
-
Ruleset Name- "Protect Prod" or whatever you like -
Enforcement status- "Disabled" (We need to do some more things before we can enable it) -
Target Branches > Add target > Include by pattern- "prod" -
Rules- "Restrict creations"
- "Restrict updates"
- "Restrict deletions"
- "Block force pushes"
Once you have those options configured, go ahead and save your changes. If we were to enable this rule right now, nobody would be able to make any changes to the prod branch under any circumstances, including our workflow. Unfortunately, there is no way to give the GitHub Actions Bot a way to bypass this ruleset, which is why we have this ruleset disabled for now. Thankfully, we can basically set up our own bot that we can give bypass permissions to this ruleset.
Create your own Bot with GitHub Apps🔗
To work around the inability to give the GitHub Actions Bot bypass permissions on our ruleset, we have to configure a GitHub App to act as our own Bot, which we can give ruleset bypass permissions to. This solution is derived from this comment on a GitHub discussion on this limitation. I will adapt the instructions there to be more specific for this particular use case. There may be slight differences in how options are presented, depending on if you are setting up the GitHub app for you user account, or for an organization. In my case, I set up the App for my organization.
-
Go to your user/org settings. Click on
GitHub Appsin theDeveloper settingssection (not theThird-party Accesssection) of the sidebar. -
Click on
New GitHub Appand set the following:GitHub App name- Set it to whatever you like, probably specify it is a bot by ending with "Bot". I named mine "Good For You Bot" since it will be operating within my company Good For You Web Services's organization.Homepage URL- Set it to your website's URL, or perhaps your organization's website if relevant.Permissions- SetContentsto "Access: Read and write"Where can this GitHub App be installed?- Set to "Only on this account"
-
Click
Create GitHub App- It should take you to your App's page. Take note of the App's ID. -
Scroll down to the
Private keyssection and click onGenerate a private key. This should download a.pemfile. Save that for later for now. -
Scroll up and click on the
Install Apptab in the sidebar. Install the app to your account/organization. You can decide to give it access to "All repositories" or "Only select repositories" - I chose all for convenience. -
Go back to your user/organization settings. Click on
Secrets and variables > Actionsin theSecuritysection of the sidebar.- Create a secret containing the contents from the
.pemfile you got previously when setting up the App's private key. - Create a variable containing the App's ID
- Create a secret containing the contents from the
At this point, our App is ready to act as our own Bot for our workflow, but we need to update the workflow to use our bot.
Use the Bot in GitHub Actions🔗
To use our bot in our GitHub Actions workflow, we have to add an additional step that authorizes the App we just created, and then perform the remainder of our git operations as our Bot. Here is what the workflow file should look like now:
name: On Release

on:
  release:
    types:
      - published

jobs:
  update-prod:
    name: Update Production Branch (Trigger Netlify Deploy)
    runs-on: ubuntu-latest
    # removed the permissions property from previous workflow
    steps:
      - name: Authorize Good For You Bot
        uses: actions/create-github-app-token@v1
        id: app-token
        with:
          app-id: ${{ vars.GOOD_FOR_YOU_BOT_ID }} # Use the App's ID environment variable
          private-key: ${{ secrets.GOOD_FOR_YOU_BOT_KEY }} # Use the private key environment secret
      - name: Checkout Prod
        uses: actions/checkout@v4
        with:
          fetch-depth: 0
          ref: prod
          token: ${{ steps.app-token.outputs.token }} # Check out the repo as the Bot
      - name: Update Prod to Current Release
        run: |
          git reset --hard ${{ github.event.release.tag_name }}
          git push -f
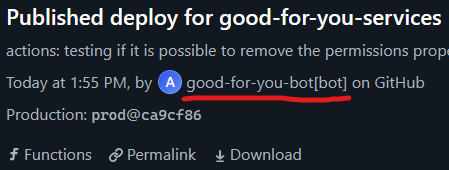
Now when this workflow runs, it will run authenticated as our App rather than via the default GitHub Actions user. This will be visible on Netlify:
Enable Branch Protection Rules🔗
Return back to your repo's settings, and go to Rules > Rulsets and click on the ruleset you created previously. Make the following changes:
Enforcement status- Set to "Active"Bypass List > Add bypass- Select your App/Bot from the dropdown. Ensure it's permissions are "Always Allow"- Click
Save Changes
Now your branch rule is active! No user except for the specified app will be able to push commits to the prod branch. Doing this is not necessary, but it does guarantee for example that you won't accidentally make commits to your prod branch that were intended for your main branch or otherwise. This peace of mind is priceless, in my opinion, so the extra work to enable these protections is worth it!
Conclusion🔗
Well this was a lot of work to create a workaround for a feature that should probably exist anyways! The most important part of all of this is that it works and it does what we want.
At this point, you should be able to publish releases whenever you like, and a production build based on your release tag will be built and published in short order. Not having to manually perform these operations anymore is nothing short of magic for me, and I hope you found this how-to helpful as well if you are still reading.
While this guide is written for GitHub & GitHub Actions, I am sure the process is relatively easily transferable to other Providers and CI/CD platforms. Additionally, this process is applicable if you simply need to keep a branch in sync with your latest release tag for any reason, not just for deploying to Netlify.